Thursday 28 November 2019

Common Data Service (Current Environment) is not visible

Hi Everyone,

Today, I have started exploring Power Automate and while working on that I observed that sometimes Common Data Service (Current Environment) is not visible.

After some search, understood that Common Data Service(Current Environment) is visible from Flows inside Solutions.

You just have to create a Solution and use an existing then start working on Flow, you will see the Common Data Service (Current Environment) Connector.


Hope this helps.

--
Happy 365'ing
Gopinath

Wednesday 27 November 2019

When role is assigned to a Team - Dynamics 365

Hi Everyone,

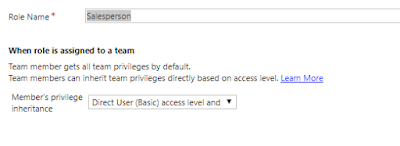
If you have observed there is a new setting on Security Role saying "When role is assigned to a team". Let's get into little deeper on that here.

As we all know that every user must be associated with a security role and even thought the user belongs to Team and the Team has Security Roles. Also, the Security that is assigned to User must have Basic Privilege to get the Privileges that were given by the Security that is associated with the Team.

With this new settings, we can say Good bye to the above statement. If we select the setting as "Direct User (Basic) access level and Team privileges" and if the User belongs to some Team and that Team has a Security Role (with setting as Default - Team privileges only) which gives access to the User and we don't need to give any security role to the Team. The users would be able to login without any issue by making use of the Team Security Role.
Hope this helps.

--
Happy 365'ing
Gopinath

Monday 25 November 2019

Modal Popups in CE - Xrm.Navigation.navigateTo - Dynamics 365 CE

Hi Everyone,

Today I was browsing something and came to know that one of the awaiting feature from many years has been released.

Many times we get the requirement to open something in Modal Popup and we all know that was no way to do that. We have that know OOB.

We just have to use the below code for it. 


var pageInput = { pageType: "webresource", webresourceName: "WebResourceName" };
var navigationOptions = {
    target: 2,
    width: 400,
    height: 300,
    position: 1
};
Xrm.Navigation.navigateTo(pageInput, navigationOptions).then(
    function success() {
        // Handle dialog closed
    },
    function error() {
        // Handle errors
    }
);

Along with this, we can use NavigateTo to navigate to Dashboards, Views. Use PageInput as below for the same.

  // Navigates to the Entities Default View.
    var pageInput = { pageType: "entitylist", entityName: "contact", viewId:"3a282da1-5d90-e011-95ae-00155d9cfa02" };
    // Navigates to the View that is mentioned in the ViewID.
    var pageInput = { pageType: "entitylist", entityName: "contact", viewId:"3a282da1-5d90-e011-95ae-00155d9cfa02" };
    // Navigages to the specified Dashobard
    var pageInput = { pageType: "dashboard", dashboardId: "45f88f83-0e67-443b-bd05-81d49719f6b1" };


Link from Microsoft Docs


Hope this helps.

--
Happy 365'ing
Gopinath

Get GridContext form the button on the Subgrid - SelectedControl

Hi Everyone,

Today I was working on adding a button on the some sub grid and on click I have to refresh that Grid after doing some business operation.  To refresh the grid, we have to get the Grid Context. This can be easily achieved by passing SelectedControl as a CRM Parameter.

function onSubgridButtonClick(selectedControl) {
    if (selectedControl.name == "ABC") {
        // Your logic
    }

}

Primary Control - Gets the FormContext
Selected Control - Gets the GridContext

Hope this helps.

--
Happy CRM'ing
Gopinath

Saturday 23 November 2019

Customize Opportunity Close Dialog Box - Dynamics 365 Sales

Hi Everyone,

There was a ask from many customer to customize Opportunity Close Dialog Box as they want put some more information while closing it.
To Customize Opportunity Close Dialog Box, first we have to enable in under System Settings.

Open CRM --> Navigate to Settings --> Administration --> System Settings.

In Sales Tab, you will find the setting as Customize Close Opportunity form and by default it is set to No. Make it as Yes to customize.

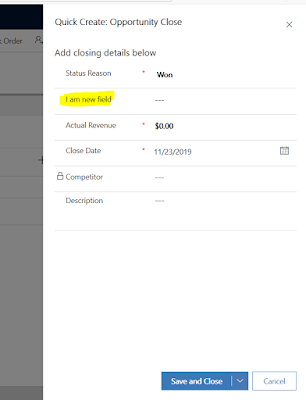
To do add/remove the fields, we have to customize Quick Create Form. I have a created a field and placed on the form. We can also write Business rules and JavaScript on the same.


Hope this helps.

--
Happy 365'ing
Gopinath

Sunday 17 November 2019

Dynamics 365 Developer Toolkit for Visual Studio 2017

Hi Everyone,

Most of the projects we use Developer Toolkit for our ongoing development activities. Recently, I have started working for a project using Visual Studio 2017 and came to know the Developer Tool Kit is not supporting VS 2017. No need to worry about that we have hack for it. Here are the steps to be followed.

1) Download Dynamics 365 Developer Toolkit for Visual Studio 2015 from marketplace. Here is the link for the same. 
2) Install 7 Zip on your machine and install it. Link
3) Extract VSIX file using 7 Zip.
4) Open the folder and open "extension.vsixmanifest" in some editor. Preferbaly notepad.
5) Change the version number number from 14.0 (highlighted below) to 15.0 as highlighted below and save the file
6) Make sure the content looks like below after changing.
7) Select all the content in the extracted folder and zip it and give the required name or you can leave it as-is.

8) Rename the extension from .zip to .vsix (To enable extension View --> check File name extensions on the menu)

9) Close all Visual Studio instance and double click on the vsix file created in the step above and click on Install.

10) You will get a warning popup for incompatibility with VS 2017. Click on Yes and Proceed.

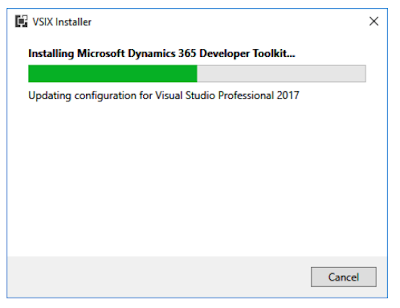
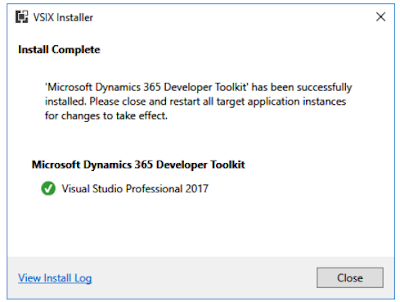
11) Once you click on Yes, the installation starts and it will show the below after insalling successfully.

12) Open Visual Studio 2017 and you will see Dynamics 365 in the menu on the New Project screen.

Hope this helps.

--
Happy 365'ing
Gopinath

Saturday 16 November 2019

Associate and Disassociate Records using C# Code - Dynamics CRM/365

Hi Everyone,

This might be a old one but somehow I could not get this piece code very easily.

Here is the piece of C# code for Associating and Dissociating two records with N:N relationship.

Associate
string relationshipName = "<<RelationShipName>>";
Relationship relationship = new Relationship(relationshipName);
EntityReferenceCollection relatedEntities = new EntityReferenceCollection();
EntityReference secondaryEntity = new EntityReference("SecondEntitySchemaName", GUIDOfSecondEntityRecord);
relatedEntities.Add(secondaryEntity);
crmService.Associate("FirstEntitySchemaName", GUIDOfFirstEntityRecord, relationship, relatedEntities);

Disassociate
string relationshipName = "<<RelationShipName>>";
Relationship relationship = new Relationship(relationshipName);
EntityReferenceCollection relatedEntities = new EntityReferenceCollection();
EntityReference secondaryEntity = new EntityReference("SecondEntitySchemaName", GUIDOfSecondEntityRecord);
relatedEntities.Add(secondaryEntity);
crmService. Disassociate ("FirstEntitySchemaName", GUIDOfFirstEntityRecord, relationship, relatedEntities);


Hope this helps.
--
Happy 365'ing

Gopinath

Tuesday 12 November 2019

Generate PDF/Send PDF as an Email Attachment - Dynamics 365 CE OOB - No Code

Hi,

We were building many solutions to generate PDF and send it as an attachment via email. This is one of the most awaiting feature.

Here are the steps for the same.

1) Open Sales Hub APP
2) Navigate to APP Settings - at the bottom of the site map, select Change area , and select App Settings.
3) Under Sales Administration, select PDF generation
4) To enable or disable PDF generation, on the Generate PDF file page, under Select whether PDF files can be created, saved, and emailed based on Dynamics 365 Sales entity records, set the Quote toggle to Enabled or Disabled. This option is set to Enabled by default.

5) Select Apply.

Now go to Quote form, you will see two buttons 

1) Create PDF and then select the Quote Template
2) Email as PDF and then select the Quote Template. Once you select the Template, email record with is populated with the below values.

To - Potential customer of the quote
From - Current user
Attachments - The generated PDF, added as an attachment
Regarding - Quote record from which the email was triggered
Subject - Quote title

Note : As of now, it is available only on Quote entity. 

Hope this helps.

--
Happy 365'ing
Gopinath

Monday 11 November 2019

Show button only when the record is selected - Selection Count Rule

Hi Everyone,

Today I was working on adding some button on the Subgrid and the requirement was to show the button when at least single record is selected.

We can easily achieve this using a Enable Rule - Selection Count Rule. Here is the enable rule of the same, we just have to attach this rule to the button command.


      <EnableRule Id="...SelectionCount.EnableRule">
        <SelectionCountRule AppliesTo="PrimaryEntity" Minimum="1" Default="false" />
      </EnableRule>

Hope this helps.

--
Happy 365'ing
Gopinath

Distance between two locations - Bing Maps

Hi Everyone,

Today I was working on Bing Maps and the requirement was there are some static locations and we have to calculate the distance between the draggable Pushpin and static locations.

Here is the full HTML of the same, please make sure that you replace BING-MAP-KEY with your key.

<html>
<head>
    <title>Drag Pushpin</title>
    <meta http-equiv='Content-Type' content='text/html; charset=utf-8' />
    <style type='text/css'>
        body {
            margin: 0;
            padding: 0;
            overflow: hidden;
            font-family: 'Segoe UI',Helvetica,Arial,Sans-Serif;
        }
    </style>
</head>
<body>
    <div id='printoutPanel'></div>
    <div id='divLatitudeUp'></div>
    <div id='divLongitudeUp'></div>
    <div id='divDistance'></div>
    <div id='myMap'></div>
    <script type='text/javascript' src='https://www.bing.com/api/maps/mapcontrol?key=BING-MAP-KEY&callback=loadMapScenario' async defer></script>

    <script type='text/javascript'>
        var zoomLevel = 10;
        var map;
        var vLatitude = "17.53512546311542";
        var vLongitude = "78.3292079101957";

        // Pushpin Dragend event.
        function pushPinDragEndEvent(id, e) {
            var point = new Microsoft.Maps.Point(e.getX(), e.getY());
            var loc = e.target.getLocation();;
            var location = new Microsoft.Maps.Location(loc.latitude, loc.longitude);
            if (id == "pushpinDragEnd") {
                document.getElementById("divLatitudeUp").innerHTML = "Latitude : " + loc.latitude;
                document.getElementById("divLongitudeUp").innerHTML = "Longitude : " + loc.longitude;
                getDistanceBetweenLocations(location, new Microsoft.Maps.Location(vLatitude, vLongitude));
            }
        }

        function loadMapScenario() {
            var map = new Microsoft.Maps.Map(document.getElementById('myMap'), { zoom: zoomLevel });
            var center = map.getCenter();
            var Events = Microsoft.Maps.Events;
            var Location = Microsoft.Maps.Location;
            var Pushpin = Microsoft.Maps.Pushpin;
            var loc = new Location(center.latitude, center.longitude);

            var dragablePushpin = new Pushpin(loc, { color: '#00F', draggable: true });
            map = new Microsoft.Maps.Map(document.getElementById('myMap'), { center: loc, zoom: zoomLevel });
            Events.addHandler(dragablePushpin, 'dragend', function (e) { pushPinDragEndEvent('pushpinDragEnd', e); });
            map.entities.push(dragablePushpin);

            var pushpin = new Microsoft.Maps.Pushpin(new Location(vLatitude, vLongitude), {
                icon: 'https://bingmapsisdk.blob.core.windows.net/isdksamples/defaultPushpin.png',
                anchor: new Microsoft.Maps.Point(12, 39),
            });
            map.entities.push(pushpin);
        }

        // Calculate distance between two locations.
        function getDistanceBetweenLocations(Location1, Location2) {
            Microsoft.Maps.loadModule('Microsoft.Maps.SpatialMath', function () {
                var vDistance = Microsoft.Maps.SpatialMath.getDistanceTo(Location1, Location2, Microsoft.Maps.SpatialMath.DistanceUnits.Miles);
                document.getElementById('divDistance').innerHTML = "Distance in Miles : " + vDistance;
            });
        }

    </script>
</body>
</html>

Hope this helps.

--
Happy Coding
Gopinath

Sunday 10 November 2019

Drag Pushpin on Bing Map - JavaScript

Hi,

Today, we have got some requirement where the users should be able to drag the Pin on the Map and we should get the Latitude and Longitude of that position.

We have to use "dragend" event for it.

Here is the full html of the same. Just replace BING-MAP-KEY with your Bing Map Key.


<html>
<head>
    <title>Drag Pushpin</title>
    <meta http-equiv='Content-Type' content='text/html; charset=utf-8' />
    <style type='text/css'>
        body {
            margin: 0;
            padding: 0;
            overflow: hidden;
            font-family: 'Segoe UI',Helvetica,Arial,Sans-Serif;
        }
    </style>
</head>
<body>
    <div id='printoutPanel'></div>
    <div id='divLatitudeUp'></div>
    <div id='divLongitudeUp'></div>
    <div id='myMap'></div>
    <script type='text/javascript' src='https://www.bing.com/api/maps/mapcontrol?key=BING-MAP-KEY&callback=loadMapScenario' async defer></script>
    <script type='text/javascript'>
        var zoomLevel = 10;
        var map;
        function handleArgs(id, e) {
            var point = new Microsoft.Maps.Point(e.getX(), e.getY());
            var loc = e.target.getLocation();;
            var location = new Microsoft.Maps.Location(loc.latitude, loc.longitude);
            if (id == "pushpinDragEnd") {
                document.getElementById("divLatitudeUp").innerHTML = "Latitude : " + loc.latitude;
                document.getElementById("divLongitudeUp").innerHTML = "Longitude : " + loc.longitude;
            }
        }

        function loadMapScenario() {
            var map = new Microsoft.Maps.Map(document.getElementById('myMap'), { zoom: zoomLevel });
            var center = map.getCenter();
            var Events = Microsoft.Maps.Events;
            var Location = Microsoft.Maps.Location;
            var Pushpin = Microsoft.Maps.Pushpin;
            var loc = new Location(center.latitude, center.longitude);

            var dragablePushpin = new Pushpin(loc, { color: '#00F', draggable: true });
            map = new Microsoft.Maps.Map(document.getElementById('myMap'), { center: loc, zoom: zoomLevel });
            Events.addHandler(dragablePushpin, 'dragend', function (e) { handleArgs('pushpinDragEnd', e); });
            map.entities.push(dragablePushpin);
        }

    </script>
</body>

</html>


Hope this helps.

--
Happy Coding
Gopinath