Sunday, 15 December 2019

Dynamics 365 Customer Engagement Diagnostics Tool for Online - Check Latency

Hi Everyone,

Sometimes the performance of the system would be very bad and the customers might complain that was working fine last day. We all know that Performance is the big thing and have to consider multiple parameters. However, sometimes it is worth to check the Latency of the system from multiple places and multiple networks to understand.

Here are the steps for the same.

1) Login to the system which you would like to check.
2) Copy the URL till .com and append with /tools/diagnostics/diag.aspx and hit the browser.
https://abc.crm.dynamics.com/tools/diagnostics/diag.aspx
3) Below Page would open up and click on Run to start the diagnostics.
Hope this helps.

--
Happy 365'ing
Gopinath

Friday, 13 December 2019

Reference Panels - Dynamics 365 Customer Engagement

Hi Everyone,

Today I was working on some form design and noticed that there is new thing under tabs as Reference Panel. Explored it little bit and here are more details on the same.

It can display buttons on the form and users can navigate between them. It can display the Sub grid or Quick View form in that and we can give the ICON to select. 

This is good to show two views from the same entity or different entity and users can click the button to see the details. 


Let's see how to configure this.

Navigate the form you would like to add and select Section -> Reference Panel

It will add as a section on the form. Select that section, click Insert on the ribbon and add required Sub grids or Quick View forms with the images.

Add each sub grid into the Reference Panel under each other. Once configured with the required sub grids, publish the form and open in the unified interface.
Hope this helps.

--
Happy 365'ing
Gopinath

Thursday, 12 December 2019

Server to Server Authentication in Power Automate (Microsoft Flow) - Service Prinicipal

Hi Everyone,

We all know that how important role that Server to Server Authentication is playing now a days. All CDS connections runs under some user context and sometimes we might have to go with Server to Server Authentication. When we setup Service Principal, it will automatically show the UI to give input of Client ID, Client Secret and Tenant ID. Here are the steps for the same.

Select Common Data Service on Flow and select the required action to perform.

Click on ... and select Add Connection.

Click on Connect with Service Prinicipal and enter the required details.

Here is the Step by Step process to configure Application User for getting Server to Server Authentication.

Hope this helps.

--
Happy 365'ing
Gopinath

Step by Step process to configure Application User for getting Server to Server Authentication


Hi Everyone,

Here are the steps to configure Application User for getting Server to Server Authentication.

Create Azure App on Azure

1) Navigate to https://admin.microsoft.com and sign in, or from your D365 organization web page select the application launcher in the top left corner.
2) Choose Admin > Admin centers > Azure Active Directory
3) From the left panel, choose Azure Active Directory > App registrations
4) Choose + New registration

5) In the Register an application form provide a name for your app, select Accounts in this organizational directory only, and choose Register. A redirect URI is not needed for now.

6) On the Overview page, select API permissions
7) Choose + Add a permission

8) In the Microsoft APIs tab, choose Dynamics CRM

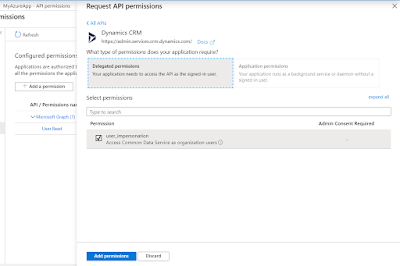
9) In the Request API permission form, select Delegated permissions, check user_impersonation, and select Add permissions

10) Wait for few mins.
11) On the API permissions page below Grant consent, select Grant admin consent for "org-name" and when prompted choose Yes. In my case, org-name is "MS"


12) In the navigation panel, select Certificates & secrets

13) Below Client secrets, choose + New client secret to create a secret
14) In the form, enter a description and select Add. Record the secret string. You will not be able to view the secret again once you leave the current screen.
15) Select Overview in the navigation panel, record the Display name, Application ID, and Directory ID values of the app registration. You will provide these later in the code sample.

Application User creation

To create an unlicensed "application user" in your Dynamics 365 organization, follow these steps. This application user will be given access to your organization's data on behalf of the end user who is using your application.

1) Navigate to https://admin.microsoft.com and sign in, or from your D365 organization web page select the application launcher in the top left corner.
2) Choose Admin > Admin centers > Azure Active Directory
3) In the left navigation panel, choose Users and Select + New user
4) In the User form, enter a name and username for the new user and select Create. Make sure the username contains the organization domain URL of your D365 tenant (i.e., someuser@myorg.onmicrosoft.com). You can exit Azure AD now.
Navigate to your D365 organization
5) Navigate to your D365 organization
Navigate to Settings > Security > Users
Choose Application Users in the view filter
Select + New

In the New User form (Application User Form), enter the required information. These values must be identical to those values for the new user you created in the Azure tenant.

User Name - The Username that was created on Azure Active Directory
Application ID - You can get this from the App (Overview section) that is created under App Registrations
Full Name and Primary Email - As your wish.


6) If all goes well, after selecting SAVE, the Application ID URI and Azure AD Object Id fields will auto-populate with their correct values.
7) Before exiting the user form, choose MANAGE ROLES and assign a security role to this application user so that the application user can access the desired organization data. I gave Administrator as a role but you can give the role as per your requirement.

Download the sample code from here and test it.

Hope this helps.

--
Happy 365'ing
Gopinath

Friday, 6 December 2019

Enable Enhanced email - Dynamics 365 CE Sales

Hi Everyone,

Today, I was exploring new features of Dynamics 365 CE and saw this new feature in Dynamics 365 for Sales under App Settings as Enhanced email.

The existing experience is when we click on Email from Timeline the system will takes us to the new create form by loosing the complete context of the Parent. 

Set Enable Enhanced Email to True under AppSettings and see what happens.
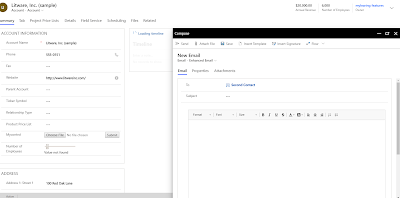
It will open the email on the same window but still attached to the main screen with Minimize, Popout and Close button. It gives good way for the users to copy the values/refer the data from the main record.

We can also navigate to other records with the popup email windows still open. Below we have navigated to the account record and we still have our email window open.

We can also have maximum of 3 email windows opened at any point of time.

Hope this helps.

--
Happy 365'ing
Gopinath

Terminate Control - Power Automate (Microsoft Flows)

Hi Everyone,

As we all know that Dynamics 365 CE Product Team is recommending Power Automate (Microsoft Flows) instead of Background workflows in CRM. That way, things will be executed completed outside of CRM/CE and there won't any load on the CE instance. Also, Power Automate comes with lot of other features and connectors.

Today, I was exploring Flows and as we have Stop Workflow step in the Workflow, I was checking for the same in Flow and you know, yes we do have the same feature in Flows as well.

Search for Terminate Control in the Action and you will see.


It comes with three options Cancelled, Failed and Succeeded. For Failed, we can give Code and Message. The same would be passed as a response.


Please note Terminate Control terminates (stops) the complete process. 

There is an option to Enter Custom Value for status. However, it is not working  and throws below error while saving the flow.


Hope this helps.

--
Happy 365'ing
Gopinath

Get/Set Lookup field value using JavaScript in Dynamics CRM/Dynamics 365 CE

Hi Everyone,

Sometimes, it is really good to keep required and repeated code handy. 

Here is the JavaScript code for getting and setting value from CRM/CE Lookupfield.

// Get the Lookup Value.
function getLookupDetails(executionContext) {
    var formContext = executionContext.getFormContext();
    var entityName, entityId, entityLabel, lookupFieldObject;
    lookupFieldObject = formContext.data.entity.attributes.get("parentcontactid");
    if (lookupFieldObject.getValue() != null) {
        entityId = lookupFieldObject.getValue()[0].id.slice(1, -1);
        entityName = lookupFieldObject.getValue()[0].entityType;
        entityLabel = lookupFieldObject.getValue()[0].name;
    }
}

// Set the Lookup Value.
function setLookupField(executionContext) {
    var formContext = executionContext.getFormContext();
    var lookupData = new Array();
    var lookupItem = new Object();
    lookupItem.id = "74a968c5-6505-ea11-a81e-000d3a300ec6";
    lookupItem.name = "Nancy";
    lookupItem.entityType = "contact";
    lookupData[0] = lookupItem;
    formContext.data.entity.attributes.get("parentcontactid").setValue(lookupData);

}

Hope this helps.

--
Happy 365'ing
Gopinath

Thursday, 5 December 2019

Parallel Loop in Power Automate (Microsoft Flow) - Degree of Parallelism

Hi Everyone,

Today I was exploring something on flows and came to know about "Degree of Parallelism". Here is the more information on the same.

There are many situations, we might loop through the records and do some operation. In this example, I am retrieving records from CE and updating them by looping through each one and it took 2 minutes to complete the operation sequentially. That means only one child record is processed at a time.

We can improve the performance of this by enabling "Concurrency Control" and setting "Degree of parallelism" from Apply Each control settings.

Once we apply the setting, it took only 6 Seconds in my scenario after setting the degree of parallelism to 20 (Max value is 50).

Hope this helps.

--
Happy 365'ing
Gopinath

Monday, 2 December 2019

Calling Flow (Power Automate) from PowerApps - Dynamics 365 CE

Hi Everyone,

In this article, I am going to create a simple Power APP and call a Flow from  it.

Login to your Power Apps environment - https://us.create.powerapps.com/studio/
Select Blank App -> Phone Layout.

Arrange the required Labels, Text Fields and Buttons.

Select Action as shown in the below and click on Flows --> New --> Instant -- From blank.

It will open the below screen and select PowerApps as a trigger.

In the next Select, Search for Common Data Service and select "Common Data Service"
and then in the Actions select Create a new record.

Select the Required entity.

Click on Last Name field and select on Ask in PowerApps to generate a Parameter.

Select other fields and select on Ask in PowerApps (If you don't see Ask in PowerApps, click on See more)

Save the Step and click on New Step as "Respond to a PowerApp or flow"

Click on Add Output and select Text.

Give the Title and select Value as Contact Unique Identifier.

Give the good name to understand the functionality.

Save the flow and move to PowerApps screen.

Select the button on the screen and Click on Flows from Action on the top menu. It shows the flow that was created. Once you select the flow, it shows as Adding.

We have to update the formulate to send the field's value to the flow as below.

The above works things works fine to hit Flow but as we need to capture the Output of it, we have to change it the Formula as below.
"Set(varContactID, power.Run(TextInput1.Text, TextInput2.Text).contactid);"


Select the label on which we have to show the value and set the Variable that is used to store the output from flow on the button click.

Run and test it.


Hope this helps.

--
Happy 365'ing
Gopinath