Sunday, January 26, 2020

Company News Timeline in Dynamics 365 Customer Engagement

Hi Everyone,

Today I was working on some POC and I had a requirement where I have to take some information from Opportunity and open the search on the form. Somehow, I thought I heard about this requirement sometime ago and searched it. 

And yes, my memory is not bad. There is a feature called Company News Timeline release with Dynamics 2016 Update 1. Let's try to understand more on this.

Company New Times shows the latest new about the customer on CE forms. This uses Bing Search for getting all the information. Here are the steps to install the same.

  • Sign in to https://admin.microsoft.com with your Global Administrator or Dynamics 365 for Customer Engagement System Administrator credentials.
  • Click Admin > Dynamics 365 for Customer Engagement.
  • On the Manage all Dynamics 365 for Customer Engagement (online) instances page, select the instance to add the solution to.
  • Click Solutions.
Select the Company News Timeline solution, and then click Install.
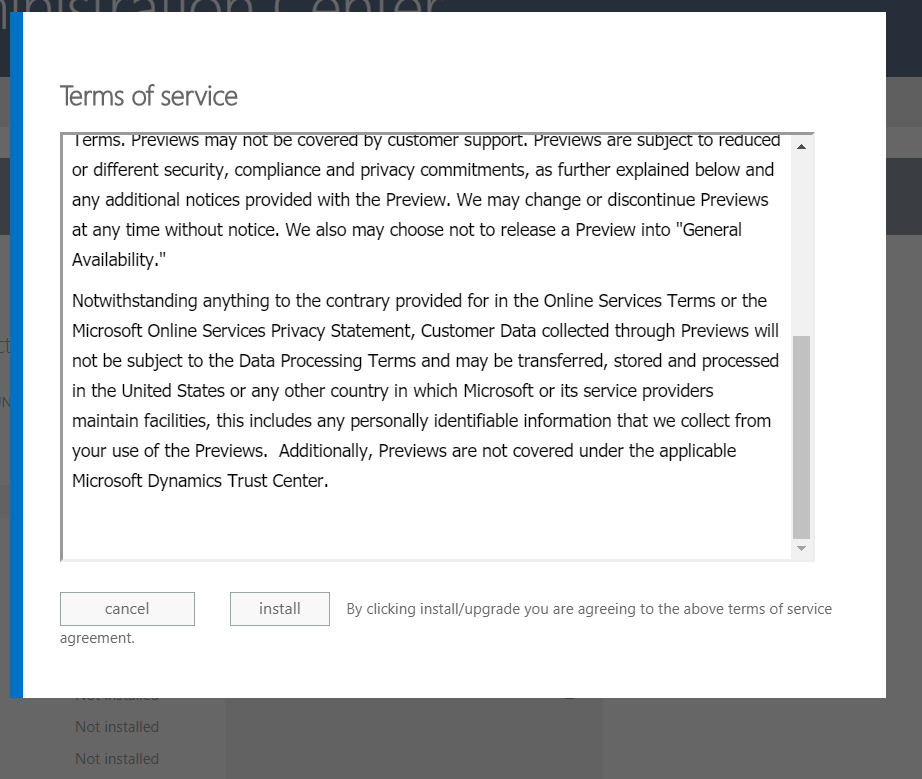
  • Accept Terms and Conditions.
  • The status shows as Installation pending and give sometime for it to install.
After installing you can go to the Opportunity and you will see the new timeline on the left side of the form.
Please read Privacy notice before using it. Thanks.

Hope this helps.

--
Happy 365'ing
Gopinath

Thursday, January 23, 2020

Shared Projects Reference not showing in Visual Studio - Dynamics 365 Developer Toolkit Template

Hi Everyone,

Today I was working on new project setup on Dynamics 365 Customer Engagement. We are using Developer Tool Kit, we all know that for some reason we have to stop using ILMerge and start using Shared Project if you want to divide the code like Business Processes and EntityWrapper.

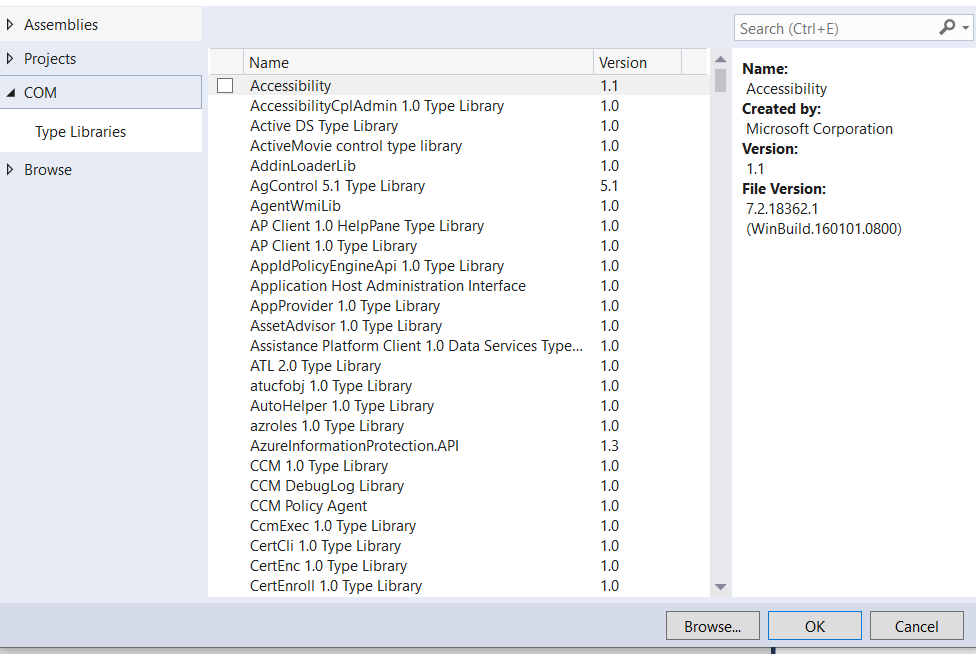
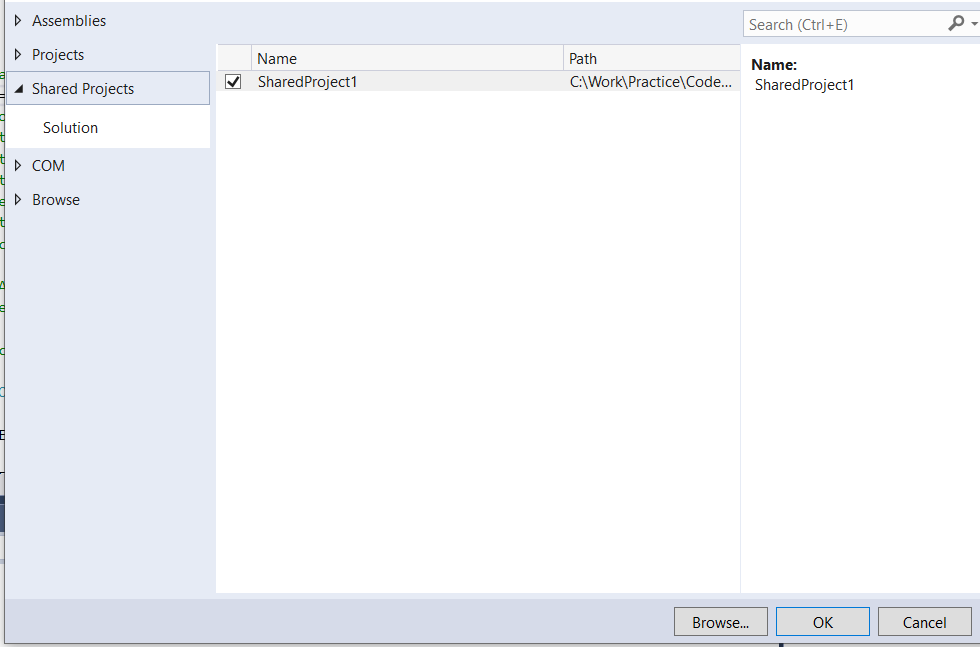
I have created the Project using Dynamics 365 Template (Which comes with Developer Toolkit) and I have created SharedProject in the same solution. When I tried to give the reference, I was not able to see any option to reference of the Shared Project. It was like below.

How it should like is below. I am sure there is something going with the Template whatever we used from Developer Toolkit. 

Here is the way to solve, you just have open the Project file (.csproj) file in notepad add the below line at the end before Project End tag

<Import Project="..\SharedProject1\SharedProject1.projitems" Label="Shared" />
SharedProject1 - Folder of the SharedProject
SharedProject1.projitems - You will see this file in the location where you have created Shared Project.

Hope this helps.

--
Happy 365'ing
Gopinath
Application User creation - Dynamics 365

Hi Everyone,

To create an unlicensed "application user" in your Dynamics 365 organization, follow these steps. This application user will be given access to your organization's data on behalf of the end user who is using your application.

1) Navigate to https://admin.microsoft.com and sign in, or from your D365 organization web page select the application launcher in the top left corner.
2) Choose Admin > Admin centers > Azure Active Directory
3) In the left navigation panel, choose Users and Select + New user
4) In the User form, enter a name and username for the new user and select Create. Make sure the username contains the organization domain URL of your D365 tenant (i.e., someuser@myorg.onmicrosoft.com). You can exit Azure AD now.
Navigate to your D365 organization
5) Navigate to your D365 organization
Navigate to Settings > Security > Users
Choose Application Users in the view filter
Select + New


In the New User form (Application User Form), enter the required information. These values must be identical to those values for the new user you created in the Azure tenant.

User Name - The Username that was created on Azure Active Directory
Application ID - You can get this from the App (Overview section) that is created under App Registrations
Full Name and Primary Email - As your wish.


6) If all goes well, after selecting SAVE, the Application ID URI and Azure AD Object Id fields will auto-populate with their correct values.

7) Before exiting the user form, choose MANAGE ROLES and assign a security role to this application user so that the application user can access the desired organization data. I gave Administrator as a role but you can give the role as per your requirement.

Hope this helps.

--
Happy 365'ing
Gopinath
Monday, January 20, 2020

Phone Call Regarding Object Type in Microsoft Flow - Power Automate

Hi Everyone,

Today I got a requirement to update the Case record when a phone call record is created or update under Case. Yes, it is very simple requirement and we can use OOB Workflow and finish it in 10 minutes. As we all know that workflows are getting deprecated, I started using Flow.

It was fine, I have added all the required steps and below is the condition I have taken for checking the regarding object type but when I was testing it was never satisfying. 

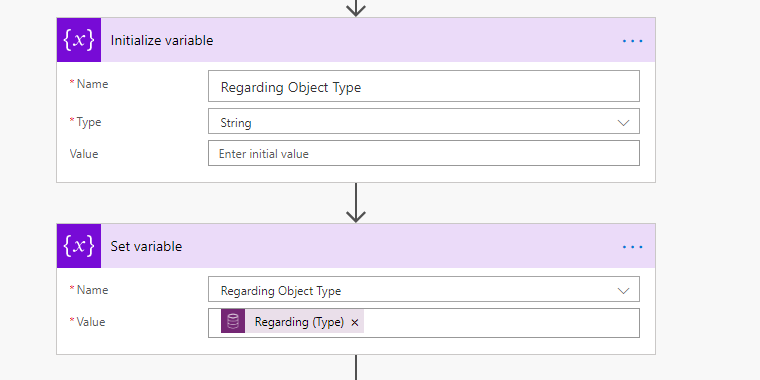
Created two steps as Initialize and Set Variable to understand what exactly the value that is coming to the field.

To my surprise, the result is null and my doors are closed to check the condition.
If I leave it like this, the flow will trigger and every phone call create/update and tries to update the Case and fails if the phone call is not associated with the Case record.

After some search came to know that we have to below expression to check the Regarding Type and it worked for me.

triggerOutputs()?['body/_regardingobjectid_type']

Hope this helps.

--
Happy 365'ing
Gopinath

Thursday, January 16, 2020

Under Operator in Dynamics 365

Hi Everyone,

Today I was working on some reporting requirement and it was like I have Account Info and we have to get all Opportunities related to the child accounts of the given account.

Confused, let me put in more simple here. Here is my account hierarchy.

Child 1 has two Opportunities and Child of Child 2 has two Opportunities. In one go, we have to retrieve all these and show them on UI. I was not aware of how to do this for the first time and after some search found Under Operator that came to rescue me.

Just used Account Under Parent, here is the query and output.

Hope this helps.

--
Happy 365'ing
Gopinath

Friday, January 10, 2020

What's new - Personal Wall not showing on UCI Dashboard - Dynamics 365 CE

Hi Everyone,

Today, I got a requirement to show Personal Wall on a custom Dashboard on UCI. We all know that we just have to add PersonalWall.htm web resource on the Dashboard, after adding I have published and refreshed the page to check how it renders on UCI.

To my surprise, it didn't show and I opened Customer Service Representative Social Dashboard to check how it is working as the Personal Wall is pre-configured by Product on that dashboard. Somehow it didn't show there as well and on Classic it was perfectly fine.

Classic - Customer Service Representative Social Dashboard.

UI - Classic - Customer Service Representative Social Dashboard - The section itself is not shown.


After some search, I came to know that Personal Wall is no more working on UCI and we have to add Timeline Control on the Dashboard to show Posts on UI.


Hope this helps.

--
Happy 365'ing
Gopinath

Wednesday, January 8, 2020

Business Process Flow is not showing when we do Switch Process - Dynamics 365

Hi Everyone,

Today, I was working on Business Process Flows and I have created a new BPF as per the requirement, Saved, Validated and Published. When I was testing noticed that new BPF is not showing on Customer Service APP.

I was wondered and tried publishing, restarting the session, re-activating the BPF but nothing worked. 
After some search came to know that we have add the BPF in APP Designer of the Model Driven APP (in my case, Customer Service App).
After adding the new BPF in the APP, it turned to show on Case form when I do Switch Process. 

Hope this helps.

--
Happy 365'ing
Gopinath

Tuesday, January 7, 2020

Dynamics 365 CE - Optimistic Concurrency - Handling Concurrent Transactions

Hi Everyone,

Let's discuss something on Optimistic Concurrency today. 

What are Concurrent Transaction?

When two or more users need to update a same record at the same time, the changes made by the last user will be saved and this results data loss. The operations performing by users on the record at the same are known as Concurrent Transactions.

In general, there are two ways to control this behavior.

1) Pessimistic Concurrency Control
When a user is modifying the data, another user can’t access the same data at same time as the access has been locked on that data.
2) Optimistic Concurrency Control
This feature provides the ability for your applications to detect whether an entity record has changed on the server in the time between when your application retrieved the record and when it tries to update or delete that record.

On all entities, you will see a OOB filed "Version Number" of type Timestamp and it gets updated by the system every time when the record updates.

In the below code, I am retrieving the record and trying to update but before updating the record using the code I am going update the record manually in CRM. The below code will throw the exception as below.

"The version of the existing record doesn't match the RowVersion property provided."

            try
            {
                // Retrieving the account record.
                Entity entAccount = crmService.Retrieve("account", new Guid("4921991e-162d-ea11-a813-000d3a59f4b3"), new ColumnSet(new string[] { "name" }));
                // Creating a new object and updating the account record that was retrieved above by setting Concurrency Behavior to If RowVersionMatches.
                Entity entAccountToUpdate = new Entity("account");
                entAccountToUpdate.Id = entAccount.Id;
                entAccountToUpdate["name"] = "My Account Name";
                // Setting up the Row Version.
                entAccountToUpdate.RowVersion = entAccount.RowVersion;
                UpdateRequest accountReq = new UpdateRequest()
                {
                    Target = entAccountToUpdate,
                    ConcurrencyBehavior = ConcurrencyBehavior.IfRowVersionMatches
                };
                UpdateResponse accountUpdateResponse = (UpdateResponse)crmService.Execute(accountReq);
            }
            catch (FaultException<OrganizationServiceFault> fx)
            {
                switch (fx.Detail.ErrorCode)
                {
                    case -2147088254: // ConcurrencyVersionMismatch
                    case -2147088253: // OptimisticConcurrencyNotEnabled
                        throw new InvalidOperationException(fx.Detail.Message);
                    case -2147088243: // ConcurrencyVersionNotProvided
                        throw new ArgumentNullException(fx.Detail.Message);
                    default:
                        throw fx;
                }
            }

Hope this helps.

--
Happy 365'ing
Gopinath

Sunday, December 15, 2019

Dynamics 365 Customer Engagement Diagnostics Tool for Online - Check Latency

Hi Everyone,

Sometimes the performance of the system would be very bad and the customers might complain that was working fine last day. We all know that Performance is the big thing and have to consider multiple parameters. However, sometimes it is worth to check the Latency of the system from multiple places and multiple networks to understand.

Here are the steps for the same.

1) Login to the system which you would like to check.
2) Copy the URL till .com and append with /tools/diagnostics/diag.aspx and hit the browser.
https://abc.crm.dynamics.com/tools/diagnostics/diag.aspx
3) Below Page would open up and click on Run to start the diagnostics.
Hope this helps.

--
Happy 365'ing
Gopinath
Friday, December 13, 2019

Reference Panels - Dynamics 365 Customer Engagement

Hi Everyone,

Today I was working on some form design and noticed that there is new thing under tabs as Reference Panel. Explored it little bit and here are more details on the same.

It can display buttons on the form and users can navigate between them. It can display the Sub grid or Quick View form in that and we can give the ICON to select. 

This is good to show two views from the same entity or different entity and users can click the button to see the details. 


Let's see how to configure this.

Navigate the form you would like to add and select Section -> Reference Panel

It will add as a section on the form. Select that section, click Insert on the ribbon and add required Sub grids or Quick View forms with the images.

Add each sub grid into the Reference Panel under each other. Once configured with the required sub grids, publish the form and open in the unified interface.
Hope this helps.

--
Happy 365'ing
Gopinath

Thursday, December 12, 2019

Server to Server Authentication in Power Automate (Microsoft Flow) - Service Prinicipal

Hi Everyone,

We all know that how important role that Server to Server Authentication is playing now a days. All CDS connections runs under some user context and sometimes we might have to go with Server to Server Authentication. When we setup Service Principal, it will automatically show the UI to give input of Client ID, Client Secret and Tenant ID. Here are the steps for the same.

Select Common Data Service on Flow and select the required action to perform.

Click on ... and select Add Connection.

Click on Connect with Service Prinicipal and enter the required details.

Here is the Step by Step process to configure Application User for getting Server to Server Authentication.

Hope this helps.

--
Happy 365'ing
Gopinath

Step by Step process to configure Application User for getting Server to Server Authentication


Hi Everyone,

Here are the steps to configure Application User for getting Server to Server Authentication.

Create Azure App on Azure

1) Navigate to https://admin.microsoft.com and sign in, or from your D365 organization web page select the application launcher in the top left corner.
2) Choose Admin > Admin centers > Azure Active Directory
3) From the left panel, choose Azure Active Directory > App registrations
4) Choose + New registration

5) In the Register an application form provide a name for your app, select Accounts in this organizational directory only, and choose Register. A redirect URI is not needed for now.

6) On the Overview page, select API permissions
7) Choose + Add a permission

8) In the Microsoft APIs tab, choose Dynamics CRM

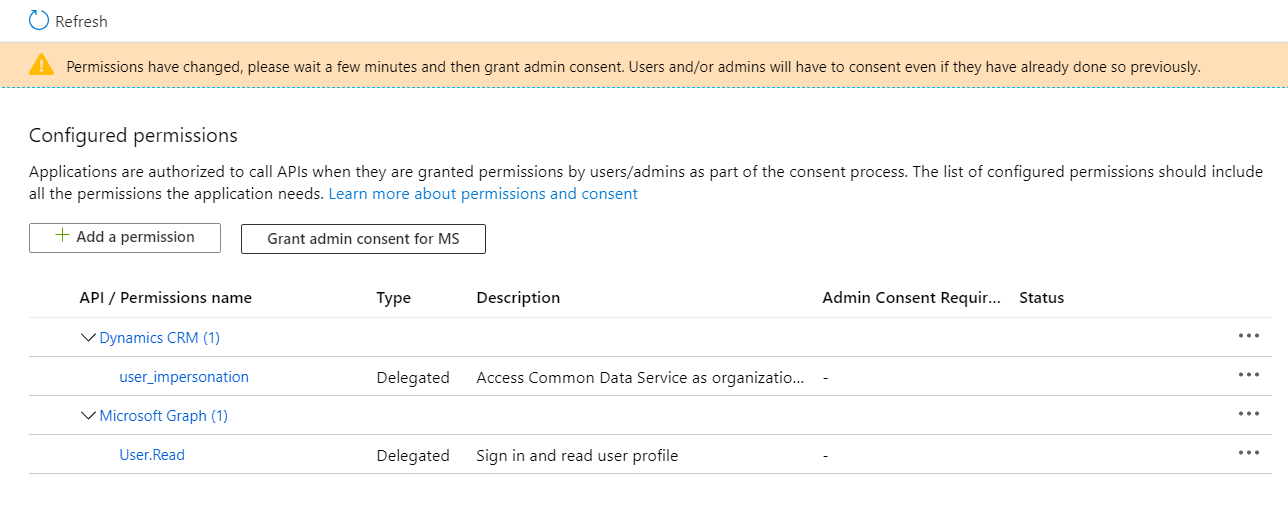
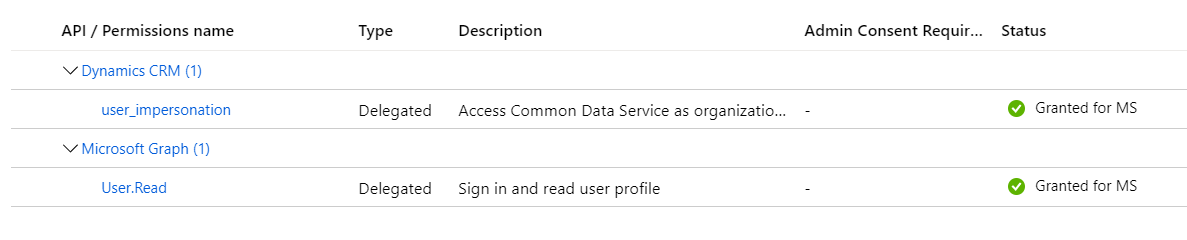
9) In the Request API permission form, select Delegated permissions, check user_impersonation, and select Add permissions

10) Wait for few mins.
11) On the API permissions page below Grant consent, select Grant admin consent for "org-name" and when prompted choose Yes. In my case, org-name is "MS"


12) In the navigation panel, select Certificates & secrets

13) Below Client secrets, choose + New client secret to create a secret
14) In the form, enter a description and select Add. Record the secret string. You will not be able to view the secret again once you leave the current screen.
15) Select Overview in the navigation panel, record the Display name, Application ID, and Directory ID values of the app registration. You will provide these later in the code sample.

Application User creation

To create an unlicensed "application user" in your Dynamics 365 organization, follow these steps. This application user will be given access to your organization's data on behalf of the end user who is using your application.

1) Navigate to https://admin.microsoft.com and sign in, or from your D365 organization web page select the application launcher in the top left corner.
2) Choose Admin > Admin centers > Azure Active Directory
3) In the left navigation panel, choose Users and Select + New user
4) In the User form, enter a name and username for the new user and select Create. Make sure the username contains the organization domain URL of your D365 tenant (i.e., someuser@myorg.onmicrosoft.com). You can exit Azure AD now.
Navigate to your D365 organization
5) Navigate to your D365 organization
Navigate to Settings > Security > Users
Choose Application Users in the view filter
Select + New

In the New User form (Application User Form), enter the required information. These values must be identical to those values for the new user you created in the Azure tenant.

User Name - The Username that was created on Azure Active Directory
Application ID - You can get this from the App (Overview section) that is created under App Registrations
Full Name and Primary Email - As your wish.


6) If all goes well, after selecting SAVE, the Application ID URI and Azure AD Object Id fields will auto-populate with their correct values.
7) Before exiting the user form, choose MANAGE ROLES and assign a security role to this application user so that the application user can access the desired organization data. I gave Administrator as a role but you can give the role as per your requirement.

Download the sample code from here and test it.

Hope this helps.

--
Happy 365'ing
Gopinath

Friday, December 6, 2019

Enable Enhanced email - Dynamics 365 CE Sales

Hi Everyone,

Today, I was exploring new features of Dynamics 365 CE and saw this new feature in Dynamics 365 for Sales under App Settings as Enhanced email.

The existing experience is when we click on Email from Timeline the system will takes us to the new create form by loosing the complete context of the Parent. 

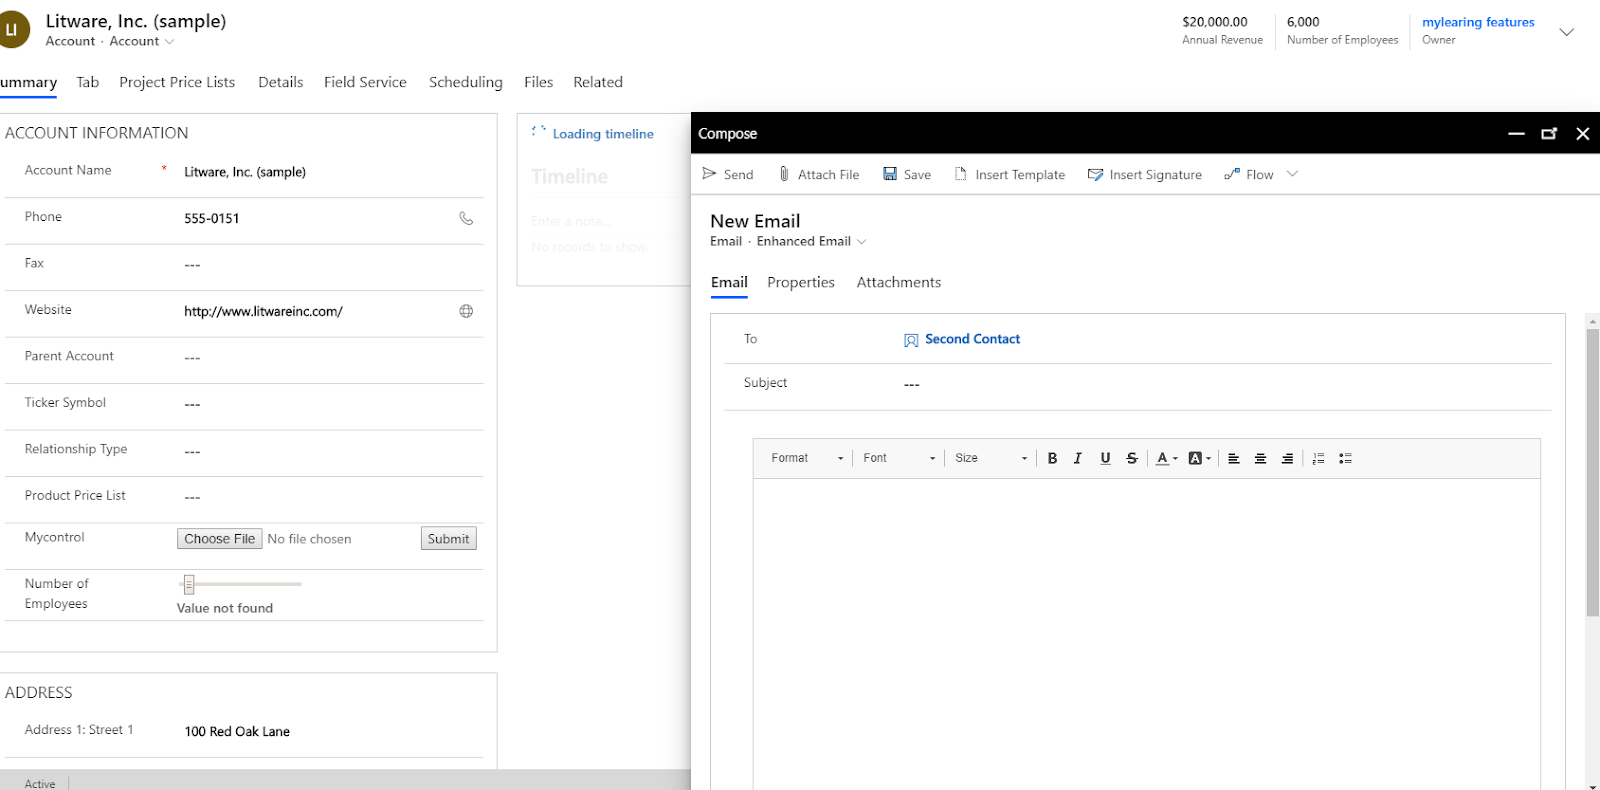
Set Enable Enhanced Email to True under AppSettings and see what happens.
It will open the email on the same window but still attached to the main screen with Minimize, Popout and Close button. It gives good way for the users to copy the values/refer the data from the main record.
We can also navigate to other records with the popup email windows still open. Below we have navigated to the account record and we still have our email window open.

We can also have maximum of 3 email windows opened at any point of time.

Hope this helps.

--
Happy 365'ing
Gopinath