Showing posts with label CE. Show all posts

Tuesday, 21 April 2020

Xrm.Navigation.openForm - Open the record with specific Business Process Flow

Hi Everyone,

Today I got some strange requirement that to open the record by setting up to specific Business Process Flow on UI when clicked on the lookup from the child form.

We need to understand multiple new things from doing this.

1) addOnLookupTagClick event - Refer this to understand more about. By this event, we can prevent the default behavior of the click event on lookup.
2) OpenForm - As we all know that we have to use Xrm.Navigation.openForm for opening the records and fortunately we can pass the ProcessId and ProcessInstanceId in the entityFormOptions. In case, if you want to open the record in a specific stage, We have pass stageID.

Here is the piece of code for the same and I have called this code on the load event.

function onLoadOfOpportunity(executionContext) {
    var formContext = executionContext.getFormContext();
    formContext.getControl('new_parentopportunity').addOnLookupTagClick(function (e) {
        e.getEventArgs().preventDefault(); // disables the default behaviour of opening the record
        // Get the lookup record 
        var lookupRecord = e.getEventArgs().getTagValue();
        // Xrm.Navigation.openForm(entityFormOptions, formParameters).then(successCallback, errorCallback);
        var entityFormOptions = {};
        entityFormOptions["entityName"] = "opportunity";
        entityFormOptions["entityId"] = lookupRecord.id;
        entityFormOptions["processId"] = "EC985A4F-E5E2-489F-A13D-4AFBECD6A769";
        entityFormOptions["processInstanceId"] = "F532CF05-8B83-EA11-A811-000D3A3E14C7";
        // Open the form.
        Xrm.Navigation.openForm(entityFormOptions).then(
            function (success) {
                console.log(success);
            },
            function (error) {
                console.log(error);
            });
    });

}

When I open the record from the HomePage grid. You see the process as "Opportunity Sales Process".

The same record if open from the lookup, you see "Second Business Process Flow"


Hope this helps.

--
Happy 365'ing
Gopinath

Thursday, 12 December 2019

Step by Step process to configure Application User for getting Server to Server Authentication


Hi Everyone,

Here are the steps to configure Application User for getting Server to Server Authentication.

Create Azure App on Azure

1) Navigate to https://admin.microsoft.com and sign in, or from your D365 organization web page select the application launcher in the top left corner.
2) Choose Admin > Admin centers > Azure Active Directory
3) From the left panel, choose Azure Active Directory > App registrations
4) Choose + New registration

5) In the Register an application form provide a name for your app, select Accounts in this organizational directory only, and choose Register. A redirect URI is not needed for now.

6) On the Overview page, select API permissions
7) Choose + Add a permission

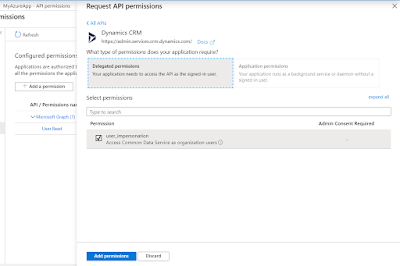
8) In the Microsoft APIs tab, choose Dynamics CRM

9) In the Request API permission form, select Delegated permissions, check user_impersonation, and select Add permissions

10) Wait for few mins.
11) On the API permissions page below Grant consent, select Grant admin consent for "org-name" and when prompted choose Yes. In my case, org-name is "MS"


12) In the navigation panel, select Certificates & secrets

13) Below Client secrets, choose + New client secret to create a secret
14) In the form, enter a description and select Add. Record the secret string. You will not be able to view the secret again once you leave the current screen.
15) Select Overview in the navigation panel, record the Display name, Application ID, and Directory ID values of the app registration. You will provide these later in the code sample.

Application User creation

To create an unlicensed "application user" in your Dynamics 365 organization, follow these steps. This application user will be given access to your organization's data on behalf of the end user who is using your application.

1) Navigate to https://admin.microsoft.com and sign in, or from your D365 organization web page select the application launcher in the top left corner.
2) Choose Admin > Admin centers > Azure Active Directory
3) In the left navigation panel, choose Users and Select + New user
4) In the User form, enter a name and username for the new user and select Create. Make sure the username contains the organization domain URL of your D365 tenant (i.e., someuser@myorg.onmicrosoft.com). You can exit Azure AD now.
Navigate to your D365 organization
5) Navigate to your D365 organization
Navigate to Settings > Security > Users
Choose Application Users in the view filter
Select + New

In the New User form (Application User Form), enter the required information. These values must be identical to those values for the new user you created in the Azure tenant.

User Name - The Username that was created on Azure Active Directory
Application ID - You can get this from the App (Overview section) that is created under App Registrations
Full Name and Primary Email - As your wish.


6) If all goes well, after selecting SAVE, the Application ID URI and Azure AD Object Id fields will auto-populate with their correct values.
7) Before exiting the user form, choose MANAGE ROLES and assign a security role to this application user so that the application user can access the desired organization data. I gave Administrator as a role but you can give the role as per your requirement.

Download the sample code from here and test it.

Hope this helps.

--
Happy 365'ing
Gopinath

Wednesday, 27 November 2019

When role is assigned to a Team - Dynamics 365

Hi Everyone,

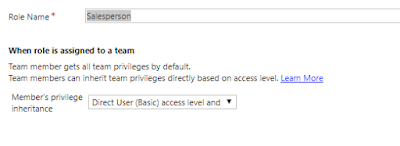
If you have observed there is a new setting on Security Role saying "When role is assigned to a team". Let's get into little deeper on that here.

As we all know that every user must be associated with a security role and even thought the user belongs to Team and the Team has Security Roles. Also, the Security that is assigned to User must have Basic Privilege to get the Privileges that were given by the Security that is associated with the Team.

With this new settings, we can say Good bye to the above statement. If we select the setting as "Direct User (Basic) access level and Team privileges" and if the User belongs to some Team and that Team has a Security Role (with setting as Default - Team privileges only) which gives access to the User and we don't need to give any security role to the Team. The users would be able to login without any issue by making use of the Team Security Role.
Hope this helps.

--
Happy 365'ing
Gopinath

Monday, 25 November 2019

Modal Popups in CE - Xrm.Navigation.navigateTo - Dynamics 365 CE

Hi Everyone,

Today I was browsing something and came to know that one of the awaiting feature from many years has been released.

Many times we get the requirement to open something in Modal Popup and we all know that was no way to do that. We have that know OOB.

We just have to use the below code for it. 


var pageInput = { pageType: "webresource", webresourceName: "WebResourceName" };
var navigationOptions = {
    target: 2,
    width: 400,
    height: 300,
    position: 1
};
Xrm.Navigation.navigateTo(pageInput, navigationOptions).then(
    function success() {
        // Handle dialog closed
    },
    function error() {
        // Handle errors
    }
);

Along with this, we can use NavigateTo to navigate to Dashboards, Views. Use PageInput as below for the same.

  // Navigates to the Entities Default View.
    var pageInput = { pageType: "entitylist", entityName: "contact", viewId:"3a282da1-5d90-e011-95ae-00155d9cfa02" };
    // Navigates to the View that is mentioned in the ViewID.
    var pageInput = { pageType: "entitylist", entityName: "contact", viewId:"3a282da1-5d90-e011-95ae-00155d9cfa02" };
    // Navigages to the specified Dashobard
    var pageInput = { pageType: "dashboard", dashboardId: "45f88f83-0e67-443b-bd05-81d49719f6b1" };


Link from Microsoft Docs


Hope this helps.

--
Happy 365'ing
Gopinath

Tuesday, 24 September 2019

Asynchronous processing of cascading transactions

Hi,

Processing of Cascading Transactions plays a crucial role when you are working with the big engagements and dealing with entities where you have many child records. You might have not observed this on the lower instance like Test, UAT, SIT or whatever but I am sure that Synchronous processing of Cascading transactions would be resulting slow performances on the Production as we have more data and transactions are being performed.

I know it's not so easy to discuss this with Customers and make them understand as mainly it deals with data integrity as if something fails someone has to monitor System Jobs. However, It's worth to discuss with Customers and make them understand the consequences and take an action.

Go through Microsoft Docs for more information.

Hope this helps.

--
Happy CRM'ing
Gopinath

Wednesday, 11 September 2019

Retrieve Cases associated with Contacts and Accounts in one go

Hi Everyone,

Today I was working on some work and got a requirement to get Cases of linked with Account and Contact. 

In a normal scenario, we can always do two Calls like 

Cases where CustomerID = Account GUID and 
Cases where CustomerID = Contact GUID

Somehow, I didn't like this approach of making two calls. Spending sometime helped to reduce a call and I was able to retrieve Cases related to Account and Contact in one call.

Here is the FetchXML I have used and uitype plays a major role here.

            <fetch version='1.0' output-format='xml-platform' mapping='logical' distinct='false'>
                                      <entity name='incident'>
                                        <attribute name='title' />
                                        <attribute name='ticketnumber' />
                                        <attribute name='createdon' />
                                        <attribute name='incidentid' />
                                        <attribute name='caseorigincode' />
                                        <order attribute='title' descending='false' />
                                        <filter type='and'>
                                          <condition attribute='customerid' operator='in'>
                                            <value uitype='account'>{ACCOUNT-GUID}</value>
                                            <value uitype='contact'>{Contact-GUID}</value>
                                          </condition>
                                        </filter>
                                     </entity>
                                    </fetch>

Hope this helps.

--
Happy CRM'ing
Gopinath

Configure Auto Number fields from OOB UI

Hi Everyone,

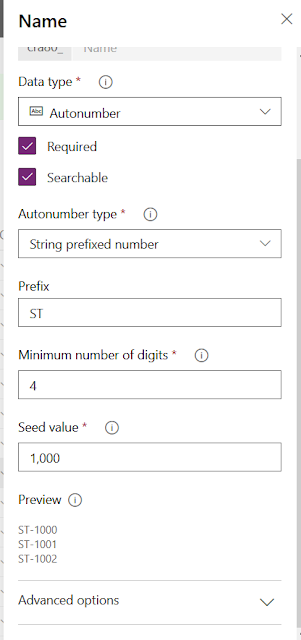
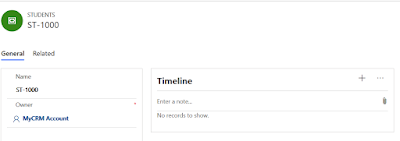
We all know there is a new UI - WYSIWYG is out for General Use and I was just trying something and found that we can create Auto number fields from new UI now. 

We used to use a piece of code to do in older versions, now with this new approach we don't need any code.

Login to CE (CRM) --> Customize the System --> Try New Experience.
Select the entity/Create a entity as per your requirement and select the field that needs to configured as Auto Number.


Hope this helps.

--
Happy CRM'ing
Gopinath