Showing posts with label Canvas App. Show all posts

Friday, 17 July 2020

Canvas App showing loading icon on Dynamics 365 CE forms - Power Platform

Hi Everyone,

Today I was working on simple Canvas App and I have to show it on Model Driven Form on Dynamics 365 CE. I have published the Canvas App, copied the URL and did set to the IFrame on the form. Here is the configuration of the same.

I have saved the Form, Published and navigated to the Account page. To my surprise, it started showing only loading icon.

I was thinking something going at the Canvas App side but when I play, it is working fine. Came to the conclusion that certainly some thing from Dynamics side is blocking the content. And finally, it is Cross-frame Script which is blocking the content. After un-checking "Restrict cross-frame scripting, where supported. " checkbox everything started working.

Hope this helps.

--
Happy 365'ing
Gopinath.

Change screen size of Canvas App - Power Platform

Hi Everyone,

Today I was on embedding a Canvas App on Dynamics 365 CE forms using Model Driven Form Integration and while creating the Canvas App, it has opened in the mobile layout but as per my requirement I need tablet layout.

After some search came to know change the layout from File --> Settings --> Screen size + orientation.

Check this link for more information.

Hope this helps.

--
Happy 365'ing
Gopinath.

Thursday, 16 July 2020

Sorry, we didn't find that App - Canvas App on Model Driven Form

Hi Everyone,

Today I did develop a small canvas app and have to show it in a section on Model Driven form (Account form). I have added a IFrame on the Model Driven Form and gave the URL of the Canvas App to IFrame. Published the form in Dynamics 365 CE and refreshed the Account page and clicked on the Tab where I have placed the Canvas App, it displayed as below.

"Sorry, we didn't find that App"

Not sure what went wrong, did check the App, URL and Tenant (thinking, I have created the app in other tenant). Everything was fine but lastly found the issue, I have Saved the app but didn't Publish. After publishing, everything worked fine. It was a silly mistake but took sometime to understand it.

--
Happy 365'ing
Gopinath.

Monday, 15 June 2020

Text Control in PowerApps

Hi Everyone,

It's all about Text Control in PowerApps (Canvas App) today. As we all know, Text is a string. Below are main properties or events which we have to remember

• OnChange  - When the state of the control changes
• OnSelect  - When the taps the control
• Visible Property - By definition, it takes bool. True  - It shows the field on the form and we can use this property to show and hide the field. 
• Default Property - Show the text the default text. Sometimes, you might get a requirement to put some text as a default text.
• Hint Text Property - This is initially greyed out and when the users taps on, it changes the control to input. I feel this is a nice one as we can put the right text and that will make users understand what exactly they have to do.
• Mode - Single or Multiline.
• Format Property - format the text Number.
• Clear - Clear shows Cross mark on the Text and user can easily clear the data.

Hope this helps.

--
Happy 365'ing
Gopinath

Thursday, 11 June 2020

Create Record in Dynamics 365 CE Using Power Apps and Power Automate (Flow)


Hi Everyone,

This is my first post on Power Apps (Canvas App) and could be very basic to most of the people but it would helpful for the beginners like me.

  • Login to Make.PowerApps.Com
  • We can directly create an App and Flows from the navigation as below but I would recommend to create a Solution first and then create App and Flow in that.
  • Create a solution with the name as you wish and select the right publisher.
  • Open the solution and click on New from Top Navigation  --> App  --> Canvas App  --> Phone form factor(I have selected for it Phone UI for this post, you can select as per your requirement)
  • Save the App first with desired name. You can use Ctrl+S as a shortcut.
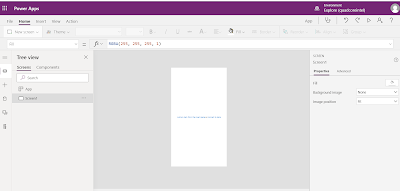
  • You will get the new tab in the browser as below.
  • From Insert Menu add required text boxes, labels and a button on the Screen. Make sure you use good naming convention as a best practice.
  • Go back to the solution again and create a flow as below.
  • Take trigger as PowerApps.
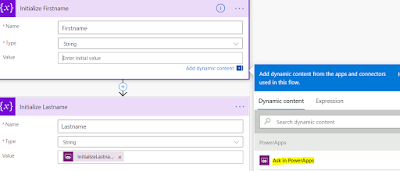
  • Declare two variables and set them to get the value from Power App. We have "Ask In Power Apps" in the value for getting the parameters.
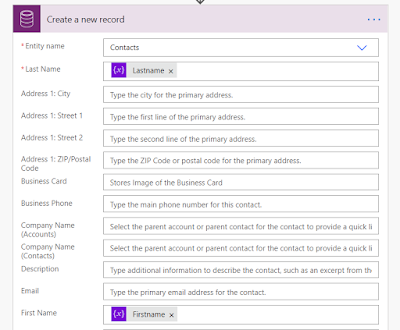
  • Add a step to create a contact in Dynamics 365 CE using Common Data Service Connector and set the values. We cannot use Common Data Service Current Environment Connector as there is an OOB issue with that. Check this for more information on that.
  • Add "Respond to PowerApp or flow" and select response which you would like to send. Here I have selected Text and gave the response as below.
  • Let's go back to our canvas app and click on Action on top  --> Power Automate.
  • It will show the Flows that you have in the Organization and select the flow the one which you have created.
  • Call below OnSelect of the Create Contact button.

Set(flowResponse, NewContactCreatingFromFlow.Run(TextFirstname.Text, TextLastname.Text)); Notify(flowResponse.message,NotificationType.Success, 3000);

The code is simple, we are calling the flow with the parameters and storing the response in a variable called flowResponse. After the execution of flow is completed, we are notifying the user with the response that we got from Flow and for this we are using Notify command.

And Let's run it..


Hope this helps.

--
Happy 365'ing
Gopinath

Wednesday, 10 June 2020

Failed during http send request - while adding flow to Canvas App

Hi Everyone,

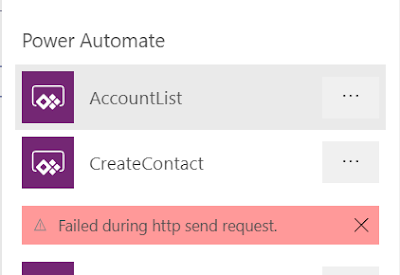
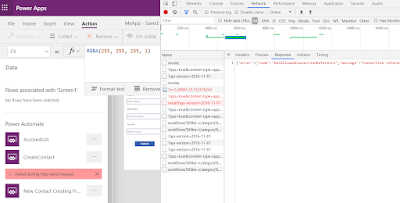
Today I was working with Flows and Power Apps (Canvas App). I have to invoke Flow from Canvas App button click and I was getting an error as below while add flow to Canvas App.

"Failed during http send request"

Spent good amount of time on understanding and it seems this is happening due to multiple reasons. One thing I came across was if you have a variable of Array data type in flows, you will get this type of issues. However, in my case I don't have anything like this.

To understand more, I have opened browser developer tools to understand what's happening while adding the flow to canvas app and here is the error that was shown in the Network.

{"error":{"code":"NotAllowedConnectionReference","message":"Connection reference 'shared_commondataserviceforapps' can not be given by invoker."}}

By this, I came to know that this is certainly due to the Common Data Service connector. I have used Common Data Service (Current Environment) Connector to do some operation. Removed it and added Common Data Service connector. And you know, it worked.

In my case, replacing Common Data Service (Current Environment) connector with Common Data Service connector solved the issue of adding flow to Canvas app. This seems to be a bug to me, hope Microsoft fixes it ASAP so that we can use capabilities of the Current Environment connector.

For now, I recommend to call the flow with CDS connector from Canvas App and have a child flow with CDS Current environment connector and call in the main flow.

Hope this helps.

--
Happy 365'ing
Gopinath

Monday, 2 December 2019

Calling Flow (Power Automate) from PowerApps - Dynamics 365 CE

Hi Everyone,

In this article, I am going to create a simple Power APP and call a Flow from  it.

Login to your Power Apps environment - https://us.create.powerapps.com/studio/
Select Blank App -> Phone Layout.

Arrange the required Labels, Text Fields and Buttons.

Select Action as shown in the below and click on Flows --> New --> Instant -- From blank.

It will open the below screen and select PowerApps as a trigger.

In the next Select, Search for Common Data Service and select "Common Data Service"
and then in the Actions select Create a new record.

Select the Required entity.

Click on Last Name field and select on Ask in PowerApps to generate a Parameter.

Select other fields and select on Ask in PowerApps (If you don't see Ask in PowerApps, click on See more)

Save the Step and click on New Step as "Respond to a PowerApp or flow"

Click on Add Output and select Text.

Give the Title and select Value as Contact Unique Identifier.

Give the good name to understand the functionality.

Save the flow and move to PowerApps screen.

Select the button on the screen and Click on Flows from Action on the top menu. It shows the flow that was created. Once you select the flow, it shows as Adding.

We have to update the formulate to send the field's value to the flow as below.

The above works things works fine to hit Flow but as we need to capture the Output of it, we have to change it the Formula as below.
"Set(varContactID, power.Run(TextInput1.Text, TextInput2.Text).contactid);"


Select the label on which we have to show the value and set the Variable that is used to store the output from flow on the button click.

Run and test it.


Hope this helps.

--
Happy 365'ing
Gopinath