Thursday 16 June 2016

Class Vs Interface in C#

Hi,

We all hear Class and Interface words through our IT Career. Here are some important notes about.
An Interface is a Contract - We specify methods and properties in it and a class implements it. Interface doesn't have any implementations.

In a very simple words we can say Interfaces are used to enforce certain Methods/Properties. In a nutshell- an interface is a set of rules. Using the interface clearly states my intent to only use members of the interface. A class can be used to inherit/override base functionality.

For example, an Animal is a class of living things, and a Lion is a class of animals. Inheritance expresses this relationship: an Lion is an Animal where Giraffe inherits from Animal. It can do anything an animal can do and more.

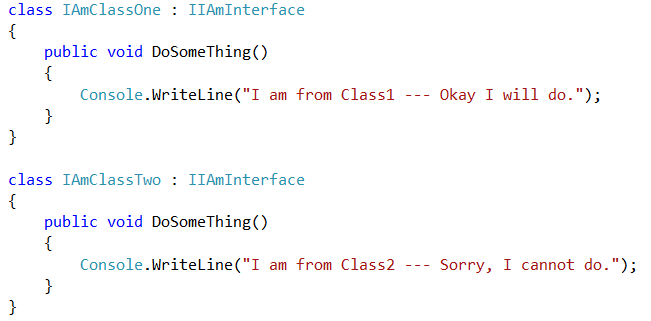
We cannot create an instance of Interface. The only way to "Create an instance of a interface in c#" is to create an instance of a type implementing the interface. The point of the interface is that it guarantees that what ever implements it will provide the methods declared within it.

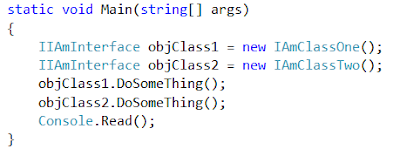
Here is the small example

We can call DoSomeThing using objClass1 or objClass2 objects like below.
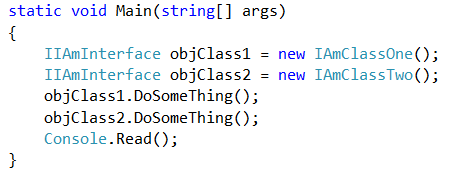
Complete Program

Output

I would prefer to write the same code like below. We can pass Interface as a type like below
Depending the object you pass you get the different behavior.
In the above example, ThisMethodShowsHowItWorks the parameter it expects is of type IIamInterface. This can take anything that implements the variable.

Hope this helps.
--
Happy Coding
Gopinath

Wednesday 15 June 2016

404 error on MVC web-site

Hi,

Today, I was started working on MVC application. I have taken the Template in Visual Studio and checked it from VS and it is working. Then I have published the things and hosted the same on IIS. When I browsed, it started giving 404 error. After some search, came to know that ASP.Net was not registered with IIS.

Follow below steps to register

Windows 7 and earlier
1. Run the Command Prompt (cmd.exe) as an administrator.
2. Navigate to the appropriate .NET Framework location. (e.g. C:\Windows\Microsoft.NET\Framework64\v4.0.30319)
3. Run aspnet_regiis.exe -i


For Windows 8 and above
1. From the start menu, type "Turn windows features on or off" and select the first result.
2. Expand Internet Information Services: World Wide Web Services: Application Development Features and select ASP.NET 4.5/4.6/whatever version you see (or ASP.NET 3.5 if you need to support projects on .NET Framework 2.0-3.5).
3. Click OK.


--
Happy Coding

Gopinath

Tuesday 14 June 2016

Customer Lookup in CRM 2016 Update 1 (8.1)

Hi,

From long time, we all know that there is a field called Customer where we can store two entities information Account and Contact.

Normally Account is used to represent a company and Contact is used to represent Individual Clients (Who are point of contact for a company). Based on need we choose Account or Contact to be stored in that field. OOB already has this type field on the following entities.

Lead
Opportunity
Quote
Order
Contract
Invoice
Case


There is no way where we can create this type of field on Custom Entities till CRM 2016 Update 1. We used to create two lookup fields one for Account and the other for Contact. Now, we can create a field of type Customer to handle this

1) Navigate to Settings --> Customizations --> Select an Entity --> Fields --> New
2) Give the Display Name and select Data Type as Customer


It will create two Many to One (N :1) relation ships from the entity you have selected and 1:N relationship from Account and Contact entities.

Hope this helps

--
Happy CRM'ing
Gopinath

Business Rule on Business Process Flow in CRM 2016

Hi,

When working with Business Process Flows most of the times we get a requirement to show/hide a field based on business conditions. We used to write a Code for it on the Stage Change and Stage Select Events.
In CRM 2016, these kind of things can be achieved using combination of Business Process Flow and Business Rule.

Here are the steps for it.

1) Open Entity Customizations and Business Rule. I have taken Opportunity as an example.

2) Create a New Business Rule as shown in the below image. I have an example to hide Proposed Solution field when Active Stage is Develop and Customer Need field contains data.

We can also write Business Rule on the Stage Change. Here is the sample for it.

In the same way, you can write business rule for setting Required Level/Visibility/Populate some value etc..

Hope this helps.

--
Happy CRM'ing
Gopinath

Tuesday 7 June 2016

Document Templates in CRM 2016

Whenever there is an update in CRM, we all know that there will be some exciting features in it.
Dynamics 2016 has brought a new way to represent the data by allowing user to create there own templates. This is almost similar to mail merge but very easy to work and use. Templates can be used for Word and Excel.
Word Templates
Here are steps that shows how to create and update a word template on Opportunity Entity.
Open any opportunity and click on Work Templates as shown in Screen shot.
We can create templates from Templates section too.

Navigate to Settings --> Templates --> Click on New --> Select Word Template and Entity and then click on Select Entity button.

This will open a popup to select the related entity relationships.
Select the relation ship and click on Download Template.

Save and Open the template
The template will be empty. To map CRM attributes, we need to enable Developer settings.
Go to File --> Options --> Customize Ribbon and Select Developer --> Click OK
After that select Developer from the Ribbon and click on XML Mapping Pane
Change the Custom XML Part to the link which starts with "urn"
It will display the Entity attributes and relation ship which we have selected while downloading the document template.

Select the fields and right click and select 'Insert Content Control' and create your layout using word tools.

The Associated entity fields are at the button of the list.
Insert a Table on the document with Two Rows (One is Header and other for data mapping)
Select each cell and map the required fields.
The most important part, Select the entire row (all the cells of the row, make sure you don't select  the table or the row from the table border).

Once the entire row is selected, right click the relation ship and select Repeating from Insert Content Control menu.
The table should look like the below screen shot.
Save the document.

Open CRM, navigate to Settings --> Templates --> Document Templates --> Click on Upload Template button. 

Browse the file from your location machine and click on Upload. CRM creates a document template record as below.
Open the record in CRM and Select the Template which you have uploaded as shown in the screen shot.
Here is the document generated for us.
--
Happy CRM'ing
Gopinath