Tuesday 23 June 2020

The Solution ID is incorrect or missing. Add the correct Solution ID to the URL and try again - Dynamics 365 CE


Hi Everyone,

Today I was getting 
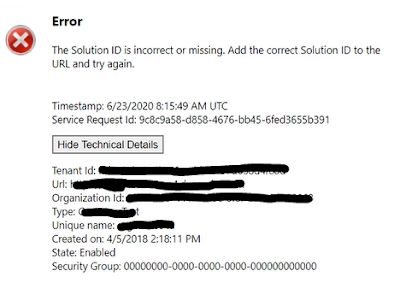
the below issue when I tried to edit Model Driven App in Make.PowerApps.com (New UI for Solutions) and it is working absolutely fine in Classic Editor.

"The Solution ID is incorrect or missing. Add the correct Solution ID to the URL and try again."

However, to understand more on this, raised a support ticket with Microsoft and continued with my R & D. After spending sometime, found that there is an issue with the URL it is trying to open.


The solution Id is considered as 00000001-0000-0000-0001-00000000009b instead of the Solution ID in which component exists.

This is the URL of the Model Driven App when I opened it from Classic UI.


By the time we analyse this, got a response from Microsoft saying this issue might be due to the missing of "Common Data Service Default Solution" in the environment and they are actively working on the fix and also trying to understand the root cause of it. For now, they have asked to continue with the Classic Editor as a work around.

Hope this helps.

--
Happy 365'ing
Gopinath

Display Components in Default Solution by Component Type in New Solution UI - Make.PowerApps.com

Hi Everyone,

I was checking the default solution in new UI, I need to check flows we have in the system. I am very new this UI and it took time for me to understand how can get the list of components by component type.

In Classic Editor, the left navigation pane helps to select the component and the canvas would show the selected component types. 

If you want to check the components by component type on new UI, you have to click on small Arrow icon beside Search on right side and it provides the option to select the component type.


Hope this helps.

--
Happy 365'ing
Gopinath

Monday 22 June 2020

Make use of Terminate Action in Flow/Power Automate

Hi Everyone,

Today I was talking to one my friends and he asked a question on how to stop the flow execution at a specified some point. I didn't get his question for the first time when I heard. 

Here is the good explanation of it.

Let's say we have a flow that has more than 30 steps and we all know how often requirement changes. I am changing the existing flow and want to execute the flow till 10 steps to understand whether I am going in a right direction or not. In C# or any coding language, we just use return statement to skip the further execution and how can we achieve the same in Flow?

I was wondering if we have any such option and finally Terminate action is the savior here. We can use Terminate Action where we would like to return and run the flow, the execution will be stopped once it reaches to Terminate action. 

Hope this helps.

--
Happy 365'ing
Gopinath

Release wave 2020 2 is on the way - Dynamics 365

Hi Everyone,

We are yet understanding good amount of features that were released in Release Wave 1 2020 of Dynamics 365 and we have Release Wave 2020 2 on its way.

July 8, 2020: Release plans available
Learn about the new upcoming capabilities for Dynamics 365 and Power Platform.
August 3, 2020: Early access available
Try the new features and capabilities that will be part of the October update of the 2020 release wave 2 before they are enabled automatically.
October 1, 2020: General availability
This is when the production deployment for the 2020 release wave 2 begins. Regional deployments will commence October 2, 2020.

Keep an eye on this Microsoft Link to get more information.

Hope this helps.

--
Happy 365'ing
Gopinath

Friday 19 June 2020

Best Practice - Adding Comments in Power Automate/Flows

Hi Everyone,

Today I was going through the settings of one of the Actions in Flow and have seen "Add a comment".  

We all know the best practice of adding comments in all programming languages and it is the same in Flows as well. As a best practice, let's put few words on what exactly we are doing in the comments. 

Hope this helps.

--
Happy 365'ing
Gopinath

Power Platform Analytics - Common Data Service, Power Automate and Power Apps

Hi Everyone,

Today I was going through Power Platform Admin Center and checked Analytics from the navigation. I remembered the days where we used to install Organization insights managed solution and check active/inactive users, storage usage, plugins success rate etc.

Now, we don't need any solution to install and there are lot more useful information to understand the system health from these analytics.

There are three analytics available, check Microsoft Docs (links below) to understand more on the roles that are needed to view the analytics and the information that would be provided.

1) Common Data Service  - Microsoft Docs Link

2) Power Automate  - Microsoft Docs Link

3) Power Apps  - Microsoft Docs Link

Hope this helps.

--
Happy 365'ing
Gopinath

Are we saying bye bye to Quick Find Views? Yes - Dynamics 365 CE

Hi Everyone,

Today I was testing some functionality in Dynamics 365 CE Unified Interface and searched for an account, I remembered we have a view named as Quick Find and whenever we do search, the system used to apply the filters from Quick Find view and show the results accordingly.

However, this has been in Unified Interface. When we search, the system honoring the view where we are, applying the same filters and showing the results. For example, If I am on My Active Accounts and do the search, here is the result.
If I do the same search on Classic, here is the result.
However, there is a toggle in System Settings to enable it. By default, the Quick Find Search View is set to No.


Hope this helps.

--
Happy 365'ing
Gopinath

Thursday 18 June 2020

Get the Count of records in Flow or Power Automate - Dynamics 365 CE

Hi Everyone,

Today I got a requirement to check the record count and do some operation if the count is greater than 1. We are very much used to these kind of checks in C# and just think if we need to the same in Flow.

Here is the way to do. We just need to know one expression for doing it. 

I have a following Action of List Records from CDS connector and renamed it to ListOfAccounts.

Declared an Integer variable and below the expression used for setting the value.

length(body('ListOfAccounts')?['value'])

Once we run the flow, the variable will have the count of accounts that are retrieved by List Records action. We can use same expression in conditions.

Hope this helps.

--
Happy 365'ing
Gopinath

Increase the limit of ExportToExcel in Dynamics 365 CE - MaxRecordsForExportToExcel

Hi Everyone,

Today I was working with one of the users and they were to looking to export more than 10000 records from Dynamics 365 CE in one go. We all know that this is the limitation in the system. Somehow, I remembered that I have read something on this where we can increase the limit and quick check has shown a way to do.

There is a configuration for this and we can update in a supported way. MaxRecordsForExportToExcel attribute in Organization entity has this information.

We need Organization ID to update this setting, get it from Advanced Settings/Settings --> Customizations --> Developer Resources  --> Instance Reference Information.

Here is the code to update the setting using C# and we can update to the max value of 2147483647 but update it as per your requirement as the huge number might put the load on the system while exporting.


Entity entOrganization = new Entity("organization");
// Get Organization ID from Developer Resources.
entOrganization.Id = new Guid("OrganizationID");
entOrganization.Attributes["maxrecordsforexporttoexcel"] = 500000;
crmService.Update(entOrganization);

Hope this helps.

--
Happy 365'ing
Gopinath

Wednesday 17 June 2020

Cool feature in Visual Studio - Generate Class from JSON or XML

Hi Everyone,

Today I was asked a question by one of my friends on if I know any easy way which can generate C# Class if we give JSON as an input. And I don't know anyway but certainly there should be an easy way to do the same.

To my surprise, it turned to be a very easy one. Visual Studio has cool feature, copy JSON or XML to the clipboard  --> Open any class file  --> Edit --> Paste Special.

Hope this helps.

--
Happy Coding
Gopinath

Collect and ClearCollect in PowerApps

Hi Everyone,

In this post, will try to understand as much as possible on Collect and ClearCollect functions in PowerApps.

Collect and ClearCollect functions are useful for when we want an in-memory store for data. They can save Collections and can be accessed from any screen in the App.

Here is the syntax

Collect(collectionName, Items)
ClearCollecct(CollectionName, Items)

These functions can be used to store JSON data.

Collect(EmployeeCollection, {Name:"John",LastName:"Henry"},   {Name:"Mike",LastName:"Jones"})

If we put this code on App Start, the code will run each time when the app loads. I have configured this as a Data Source to the Gallery to show the data and here is the result.
Now close the app and reload it so that the app start code runs. The gallery will now show the items in the EmployeeCollection.

Syntax for both collect and clearcollect is similar but the only difference is ClearCollect function deletes all the records from a collection. And then adds a different set of records to the same collection. With a single function, ClearCollect offers the combination of Clear and then Collect.

For example, we did set the StudentCollection in the AppStart and if we put the below command in OnVisible property of the Screen, the collection would be modified and output would be as below.

ClearCollect(EmployeeCollection,   {Name:"John",LastName:"Henry"} )

Where do we see these collections while developing?

To see the items in the collection go to the menu and select ‘File’. Now select ‘Collections’. When we use the PowerApps add record to collection functionality we can see the results instantly. 

If you want clear the collection, we can use Clear function.

Clear(EmployeeCollection);

Hope this helps.

--
Happy 365'ing
Gopinath

Monday 15 June 2020

Text Control in PowerApps

Hi Everyone,

It's all about Text Control in PowerApps (Canvas App) today. As we all know, Text is a string. Below are main properties or events which we have to remember

• OnChange  - When the state of the control changes
• OnSelect  - When the taps the control
• Visible Property - By definition, it takes bool. True  - It shows the field on the form and we can use this property to show and hide the field. 
• Default Property - Show the text the default text. Sometimes, you might get a requirement to put some text as a default text.
• Hint Text Property - This is initially greyed out and when the users taps on, it changes the control to input. I feel this is a nice one as we can put the right text and that will make users understand what exactly they have to do.
• Mode - Single or Multiline.
• Format Property - format the text Number.
• Clear - Clear shows Cross mark on the Text and user can easily clear the data.

Hope this helps.

--
Happy 365'ing
Gopinath

Thursday 11 June 2020

Create Record in Dynamics 365 CE Using Power Apps and Power Automate (Flow)


Hi Everyone,

This is my first post on Power Apps (Canvas App) and could be very basic to most of the people but it would helpful for the beginners like me.

  • Login to Make.PowerApps.Com
  • We can directly create an App and Flows from the navigation as below but I would recommend to create a Solution first and then create App and Flow in that.
  • Create a solution with the name as you wish and select the right publisher.
  • Open the solution and click on New from Top Navigation  --> App  --> Canvas App  --> Phone form factor(I have selected for it Phone UI for this post, you can select as per your requirement)
  • Save the App first with desired name. You can use Ctrl+S as a shortcut.
  • You will get the new tab in the browser as below.
  • From Insert Menu add required text boxes, labels and a button on the Screen. Make sure you use good naming convention as a best practice.
  • Go back to the solution again and create a flow as below.
  • Take trigger as PowerApps.
  • Declare two variables and set them to get the value from Power App. We have "Ask In Power Apps" in the value for getting the parameters.
  • Add a step to create a contact in Dynamics 365 CE using Common Data Service Connector and set the values. We cannot use Common Data Service Current Environment Connector as there is an OOB issue with that. Check this for more information on that.
  • Add "Respond to PowerApp or flow" and select response which you would like to send. Here I have selected Text and gave the response as below.
  • Let's go back to our canvas app and click on Action on top  --> Power Automate.
  • It will show the Flows that you have in the Organization and select the flow the one which you have created.
  • Call below OnSelect of the Create Contact button.

Set(flowResponse, NewContactCreatingFromFlow.Run(TextFirstname.Text, TextLastname.Text)); Notify(flowResponse.message,NotificationType.Success, 3000);

The code is simple, we are calling the flow with the parameters and storing the response in a variable called flowResponse. After the execution of flow is completed, we are notifying the user with the response that we got from Flow and for this we are using Notify command.

And Let's run it..


Hope this helps.

--
Happy 365'ing
Gopinath

Wednesday 10 June 2020

Failed during http send request - while adding flow to Canvas App

Hi Everyone,

Today I was working with Flows and Power Apps (Canvas App). I have to invoke Flow from Canvas App button click and I was getting an error as below while add flow to Canvas App.

"Failed during http send request"

Spent good amount of time on understanding and it seems this is happening due to multiple reasons. One thing I came across was if you have a variable of Array data type in flows, you will get this type of issues. However, in my case I don't have anything like this.

To understand more, I have opened browser developer tools to understand what's happening while adding the flow to canvas app and here is the error that was shown in the Network.

{"error":{"code":"NotAllowedConnectionReference","message":"Connection reference 'shared_commondataserviceforapps' can not be given by invoker."}}

By this, I came to know that this is certainly due to the Common Data Service connector. I have used Common Data Service (Current Environment) Connector to do some operation. Removed it and added Common Data Service connector. And you know, it worked.

In my case, replacing Common Data Service (Current Environment) connector with Common Data Service connector solved the issue of adding flow to Canvas app. This seems to be a bug to me, hope Microsoft fixes it ASAP so that we can use capabilities of the Current Environment connector.

For now, I recommend to call the flow with CDS connector from Canvas App and have a child flow with CDS Current environment connector and call in the main flow.

Hope this helps.

--
Happy 365'ing
Gopinath

Tuesday 9 June 2020

Mention height and width in Percentage instead of Pixels - Modal Popups in Dynamics 365 CE - NavigateTo

Hi Everyone,

Today a bug was created by the user saying the popup window is too small and we were using below code to show the HTML Webresource as a popup.

var pageInput = { pageType: "webresource", webresourceName: "WebResourceName" };
        var navigationOptions = {
            target: 2,
            width: 400,
            height: 300,
            position: 1
        };
        Xrm.Navigation.navigateTo(pageInput, navigationOptions).then(
            function success() {
                // Handle dialog closed
            },
            function error() {
                // Handle errors
            }
        );

When we have checked the code was working fine and able to see the window normally. After some checks with the users came to know that User has 19 inches monitor and that has opened doors to fix the issue. We all know that we have to use percentage instead of pixels for height and width and here is the way to use the same in NavigationOptions of NavigateTo function.

Here is the modified code of the same.

var pageInput = { pageType: "webresource", webresourceName: "WebResourceName" };
        var navigationOptions = {
            target: 2,
            //width: 400,
            //height: 300,
            width: { value: 90, unit: "%" },
            height: { value: 90, unit: "%" },
            position: 1
        };
        Xrm.Navigation.navigateTo(pageInput, navigationOptions).then(
            function success() {
                // Handle dialog closed
            },
            function error() {
                // Handle errors
            }

        );

Hope this helps.

--
Happy 365'ing
Gopinath

Preview Contact and Owner information by just hovering on the lookup - Dynamics 365

Hi Everyone,

Today I was testing something on the trail instance and I just hovered on the Contact lookup and saw pop out window like below. I haven't observed this so far.

Somehow I am impressed with it as this is giving information to the users by just hovering.

When you click on Show More button, the details are opened as a popup. I couldn't find the form that is being using here to add any of custom fields. If anyone finds, please let me know.

Users can click on Email and Phone links which will open Outlook and or Skype (if it configured else we can pick an app option)

Similarly we can view owner details by hovering on Owner lookup. 

When you click on Update your profile, it opens Delve.

Show more opens the information as a popup like below.

These improvements might not be great functional changes but certainly gives good experience to users and make their lives easier for day to day activities.

If you would like to disable these, there is a setting available in System Settings as below and we can disable it.

"Enable users to view contact cards for quick access to contact information"

Hope this helps.

--
Happy 365'ing
Gopinath

Tuesday 2 June 2020

Multimedia Control in Dynamics 365 Customer Engagement

Hi Everyone,

We all know visual presentation of anything is attracted first and if it is a video, that gives advantage. If we have a Video that is embedded on the Product record in the system that gives clear path for the sales person to explain the things.

And yes, we can easily do that using Multimedia OOB Control. You just need to create a field of Single line of text and format as URL type and put the Video URL in the field.


Add the field on the form and  --> Change Properties --> Add Control --> Select Multimedia Control and Add it.


Below are the media types that are supported as of now.

Streaming MP4 files
YouTube videos
Azure media
Audio streams

Hope this helps.

--
Happy 365'ing
Gopinath