Hi,
The tedious work we do when a Dynamics CRM Implementation goes live is getting the users on board with CRM. For this, CRM Admins must ensure that all users must have a security role to log in without any issue. When we have hundreds of users and there is a possibility that some users may get missed.
To identify the users with no security roles, CRM has a view i.e Users with no asassigned security role. This view gives the users who have a valid license but do not any security role.
Hope this helps.
--
Happy CRM'ing
Gopinath
In Dynamics 365, a new feature "Rollup View" relation behavior has been introduced. Before going in detail of this, let's understand Related Regarding Records view.
Related Regarding View - This is a special filter which automatically did a rollup of all activities associated with account/contact. It shows the activities from below conditions.
Activity associated with a child account or contact of the selected record.
Child Account or contact in the To/From (Activity party) of the activity.
Activity has the regarding set to an Opportunity, Quote, Order, Invoice, Case and Contract, a limited list of OOB entities.
If you created a custom entity that was parented by the Account or Contact and had activities created against this custom entity, they would not be displayed on the Account or Contact activities view even with the Related Regarding filter enabled.
This problem is solved by "Rollup view" feature in Dynamics 365. With this setting, we can now see the activities related to custom entities roll up to the account/contact. This is enabled only for Account and Contacts for now.
Here is the example for the same.
I have created a custom entity called Program which 1:N relationship with Account entity.
Open the Relationship and check the Relationship Behavior. You will a see setting as Roll View. Set it to Cascade All.
Create a Program record under Active Transport Inc. account and create an activity under it.
Now, navigate to "Active Transport Inc." account record and then to Activities Associated View. You will see the activity of the child records in this view.
The Rollup View flag can only be set if the following conditions are met:
- The primary and the related entity must be a 1:N (one-to-many) or N:1 (many-to-one) custom relationship. The flag can’t be set on any out-of-the-box system relationships.
- The primary entity for the relationship must be Account, Contact, or Opportunity. This is because these are the only entity forms in the system where the Activity Associated View appears. You can’t specify any other primary entity for activity rollups.
- The related entity must support Activities.
Hope this helps.
--
Happy CRM'ing
Gopinath
Dynamics 365 App for Outlook isn’t the same thing as Dynamics 365 for Outlook.
Microsoft Dynamics 365 App for Outlook paired with server-side synchronization is the preferred way to integrate Microsoft Dynamics 365 with Outlook. Note that tracking activities is not supported when Dynamics 365 App for Outlook and Dynamics 365 for Outlook are used together by the same user.
System Administrators can push the app to the user's outlook from CRM.
How to push the app the users.
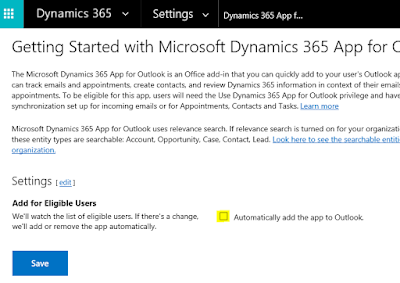
- Go to Settings > Dynamics 365 App for Outlook.
- In the Getting Started with Dynamics 365 App for Outlook screen, under Add for Eligible Users (you may have to click Settings if you’re opening this screen for the second or subsequent time)
- select the Automatically add the app to Outlook check box if you want to have users get the app automatically. If a user has the required privileges and email is synchronized through server-side synchronization, you won’t have to do anything more to push the app to them
- To push the app to all eligible users, click Add App for All Eligible Users.
- To push the app to certain users, select those users in the list, and then click Add App to Outlook.
If the list shows that a user is pending or hasn’t been added, you can click the Learn more link next to the user to find more information about status.
When you’re done, click Save.
Users can install App themselves by following the below two steps if the Server Side Sync is configured.
- Users can click the Settings button and then click Apps for Dynamics 365.
- In the Apps for Dynamics 365 screen, under Dynamics 365 App for Outlook, users click Add app to Outlook.
After few mins, users can see a Add-In on their outlook
Hope this helps.
--
Happy CRM'ing
Gopinath


