Tuesday 16 April 2019

The underlying connection was closed an unexpected error occurred on a send

Hi,

Today I was working on calling some external url via C# code using HttpRequest and I was continuously getting the below error.

The underlying connection was closed an unexpected error occurred on a send.

There could be multiple reasons for this but adding the below line before sending the request helped to fix the issue.


ServicePointManager.SecurityProtocol = SecurityProtocolType.Tls12

Hope this helps.

--
Happy Coding
Gopinath

Tuesday 9 April 2019

What is "Toast Notification Display time" in Dynamics 365

Hi,

Today I was working on some POC on a trail instance and observed that there is something called "Toast Notification Display Time" option under Settings on the Ribbon.

Let's try to understand what are Toast Notifications. For example, if you have created a record using Quick Create, you will see a message after creating saying "Your changes were saved" as shown below.

These are Toast Notifications and these will shown on the screen for some seconds and disappears. 

This particular setting Toast Notification Display Time will extend the notification display timeout to 10 times and it is default.

A quick search on this, make me understand this was added for Accessibility reasons.

Hope this helps.

--
Happy CRM'ing
Gopinath

Dynamics 365 – How to access Customizations, Solutions and Admin Features in UCI/UUI/UI Only Mode

Hi,

We all know that go forward way for Dynamics 365 is UCI and there was a major issue in that. Users has to switch back to classic to perform Admin actions. Microsoft PG heard our voices and released some easy ways to get it.

You can just click on Advanced Settings from the ribbon as shown below.

It will open a window with only Settings tab which has all Admin feature.


We don't need to worry about going back to classic and navigating. Now it is just a click.

Hope this helps.

--
Happy CRM'ing
Gopinath

Sunday 7 April 2019

Add or Remove Components and workloads in Visual Studio

Hi,

We all know that at the time of installing Visual Studio, we get a window to select the components that we need for the development so that it automatically installs everything on the machine as per the selection.

Let's say you have not selected a component at the time of installation and later you have got a requirement to start on the new things. Here is the way to go back to the installer and select the things.

1) Search for Visual Studio Installer on your machine. 

If you cannot find that on your machine, alternatively you can check at the below location or give the below path in Run window.


C:\Program Files (x86)\Microsoft Visual Studio\Installer\vs_installer.exe


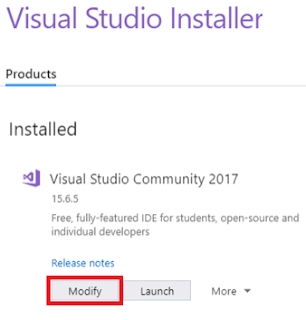
2) Click or tap to start the installer, and then choose Modify.

If you have an update pending, the Modify button is in a different place. This way, you can modify Visual Studio without updating it, should you choose to do so. Click More, and then choose Modify.

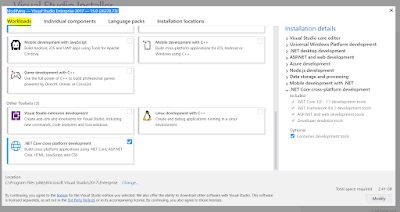
3) From the Workloads screen, select or deselect the workloads that you want to install or uninstall.

4) Choose Modify again.
5) After the new workloads and components are installed, choose Launch

Modify individual components
If you don't want to install workloads to customize your Visual Studio installation, choose the Individual Components tab from the Visual Studio Installer, select what you want, and then follow the prompts.

Hope this helps.

--
Happy Coding
Gopinath

Thursday 4 April 2019

Work Items opening in browser instead of Visual Studio

Hi,

Recently, I have installed VS 2017 and did set VSTS for one of my projects and started checking my work items. I have observed that we enter some ID on Go to Item popup, it is opening the item in the browser instead of Visual Studio. 

There is a setting that needs to setup in Visual Studio -> Tools -> Options -> Work Items -> General and select Visual Studio as shown in the screen shot below. 


Hope this helps.

--
Happy Coding
Gopinath