Tuesday 31 March 2020

Be careful while updating Dynamics 365 CE record with Multi select field using Microsoft Flow/Power Automate

Hi Everyone,

I was exploring Microsoft Flows today and was trying to create and update records with different data types. While testing observed that Multi Select values are getting overridden and it is understandable as well. However, we might have to take care it while implementing.

For example, if I am updating a record for which Multi select value is already selected and I would like to select some more. In this scenario if you set the field to consider the new value, the system will remove existing values and updates the record with the value whatever that was set by us. 

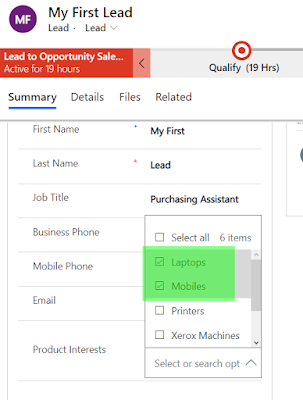
Lead - My First Lead has values as Printers for Product Interest.
In flow, I am updating that to Laptops and Mobiles.

After I ran the flow, the previous value "Printers" is no where selected on the record.

To fix this issue, we have to retrieve the record before we update and set Multi-select field with the concatenation of existing values and new values. 

Set the existing value in the variable.
Use Concat function while setting the field. Here the expression which I have used.

Syntax - concat('767070000',',','767070001',',',variables('ProductInterestExistingValues'))Here is the updated record.

Hope this helps.

--
Happy 365'ing
Gopinath

Monday 30 March 2020

Notes Analysis from Sales Insights - Dynamics 365

Hi Everyone,

Today I was going through Sales Hub and enabled Sales Insights to understand it more. As part of the Dynamics 365 Sales offering, only some of the basic features are available for free. Somehow, I feel Notes Analysis is a useful feature. It requires you to have a Sales Insight license. You can enable a free trial of this app though, to check how it works.

Enable Sales Insights in Dynamics 365

1) Navigate to Sales Hub and select Sales Insight Settings.

2) Select Try Sales Insights to enable and set up the sales insight subscription.

3) It takes few minutes to install and once the installation is completed, you will see the screen as below. Click on Go to Configuration or Navigate to Sales Insight Settings.

4) Enable Notes Analysis by click on Set up button. That's it. Notes analysis has been enabled on your instance.

Before we go into reality, let's try to understand what exactly Notes analysis does for us.

"Notes analysis provides you with suggestions for actions based on customer-related activities. When you create an activity, such as appointment, phone call, task, note, post, or custom activities, the notes analysis feature analyzes the descriptions provided in these activities and gives you intelligent suggestions. With these suggestions, you can take actions, such as creating a meeting request and adding a contact."

Let's check what exactly it does in reality.

I just opened an existing Account and entered a Notes with Subject and Description as below and the system has changed the description to link and on click of that we see a popup of the card to take an action.

Subject - Next week
Description - Le'ts have a call next week.


Subject - Meeting tomorrow
Description - Let's have a meeting tomorrow 4 PM and close the deal.


On click on Edit and Create button in the card, the system opens a Quick Create form for Phone call. There are two bugs in this, Subject has div tags and Regarding is showing No name. Hoping Microsoft fixes them soon. 


Hope this helps.

--
Happy 365'ing
Gopinath

Share a model-driven app with Power Apps - Dynamics 365

Hi Everyone,

Sharing an App to the users is much more easier than before with PowerApps new UI. Previously, it was a lengthy process which required several steps. This has been streamlined into a single panel now.

As we all know that Sharing a Model-Driven app requires two steps. 

1) Associate one or more security roles with the App.
2) Assign the Security role to users.

Here are the steps to be followed to share the app with users.

1) Visit https://make.powerapps.com
2) Select a model-driven app and click Share.

3) Select the app then choose a security role from the list.
4) Search for a user.
5) Select the user then select a role from the list.

6) Click Share.


Hope this helps.

--
Happy 365'ing
Gopinath

Sunday 29 March 2020

Save is always visible in the command bar on edit forms - Dynamics 365 Release Wave 1 2020

Hi Everyone,

Today I was just going through Sales Hub and found that Save and Save & Close buttons are not hidden even though Auto Save is enabled. In the previous version of Dynamics 365 I remember we had multiple discussions on the same (I hope everyone had :)) that Save button was not visible on the Command bar.

Even though Auto Save is enabled in the system, it is always good to have the buttons visible so that users can save the records whenever they want and it reduces the confusion.


Hope this helps.

--
Happy 365'ing
Gopinath

Sales Team Member app for users with Team Member license - Dynamics 365 Release Wave 1 2020

Hi Everyone,

The new Sales Team Member app is designed for the lightweight sales scenarios where users don't need the full capabilities of an enterprise application. This app is included with the Team Member license.

At a high level, users with the Team Member license can perform the following tasks in the Sales Team Member app:

1) Customer management: work with contacts or see accounts.
2) Lead and opportunity management: see leads or opportunities linked with accounts or contacts, or see other sales-related data.
3) Add notes and activities, such as tasks.

These restrictions were not really enforced as of now and users that has been assigned a Team Member license would not be restricted from accessing Quote or Invoice records in the system.


Microsoft has announced that they would start enforcing the restrictions and to aid customers with compliance, it is now shipping an APP that is designed for Team Member license users.

The Sales Team Member APP is now available in organizations that has Sales Hub app already installed. Along with the APP, it also ships this security role named as Sales Team Member.

Hope this helps.

--
Happy 365'ing
Gopinath

Global notification - Xrm.App (Client API Reference) - In Preview - Dynamics 365

Hi Everyone,

There are many times we might have got an requirement to show some kind of notifications globally in Dynamics 365 and there is no supported way to do it. Here is the supported way to do the same which is coming in, there is a new client API reference called Xrm.App which has two methods

1) addGlobalNotification
2) clearGlobalNotification

Please note this is a Preview feature, refer this link for more information on the updates.

To show the notification first, we need to event to trigger and that event can be from anywhere. For example, I would want to show the notification when Customer Service Representative opens a case in Dynamics 365 saying "Please inform Customer that Tomorrow is a holiday."

To implement this, we have to call the below piece of code on the load event on the case form.

    // define action object
    var myAction =
    {
        actionLabel: "Check here for more information",
        eventHandler: function () {
            Xrm.Navigation.openUrl("https://docs.microsoft.com/");
            // perform other operations as required on clicking
        }
    }

    // define notification object
    var notification =
    {
        type: 2,
        level: 4, // information
        message: "Please inform Customer that Tomorrow is a holiday.",
        action: myAction
    }

    Xrm.App.addGlobalNotification(notification).then(
        function success(result) {
            console.log("Notification created with ID: " + result);
            // perform other operations as required on notification display
        },
        function (error) {
            console.log(error.message);
            // handle error conditions
        }
    );

We can also optionally add a button and make it navigate to another URL if you would like to provide more info. In my example, I redirected to https://linkedin.com.

level: Number. Defines the level of notification. Valid values are:
1: Success

2: Error

3: Warning

4: Information


This notification remains App-wide unless closed by the user or cleared by using clearGlobalNotification method.

This can be more dynamic, you can have one some configurations saying ShowGlobalNotification, Message and Link. Whenever, you put ShowGlobalNotification to True, the code should execute and notification would be shown to the users. It can be turned Off by changing the configuration to False. No need of development and deployment. 

Hope this helps.

--
Happy 365'ing
Gopinath

Friday 27 March 2020

Refresh button missing on Roll-Up fields in Dynamics 365 UCI?

Hi Everyone,

Today I got a call from one of my friends asking is there any change in the Roll-up Fields implementation on UCI? I was wondered for sometime and I didn't read about the limitation as such and I have asked what was the reason behind that question. He explained that he was not able to find Refresh button on the field.

It looks like below in the Classic, the refresh button is inline with the field and clearly visible.


Out of curiosity, I have quickly created a roll up field and spent sometime in clicking here and there. You know what, I was able to get the Recalculate button by just clicking on button available before label of the field. And when I click on that, it is recalculating and showing the latest value.


Hope this helps.

--
Happy 365'ing
Gopinath

Add Flow Step to Business Process Flow - In Preview - Dynamics 365 CE

Hi Everyone,

Today I was a creating Business Process Flow as per my requirement and noticed a Add Flow Step (Preview) when I was trying to Add a Stage.


Just went ahead and explored it. Added a step and configured a flow to trigger. And you know, it gave me a shock :(. I thought the flow would be triggered automatically instead it has shown a button to trigger on the Business Process Flow.


I think, it should get triggered automatically without any user intervention. As this is still in preview, hoping it would be an automatic trigger once it is GA (Generally Availability).

Hope this helps.

--
Happy 365'ing
Gopinath

Thursday 26 March 2020

addOnLookupTagClick event in Dynamics 365 Release Wave 1 2020 - Restrict lookup record opening

Hi Everyone,

I was just going through Microsoft Docs to understand the new features that were released in Dynamics 365 Release Wave 1 2020 and found a new event introduced for lookups and I feel it is quite useful.

While working many of our customers might have clicked on a lookup value by mistake and the system might have redirected them to lookup record by loosing existing context of the working record. 

By using this addOnLookupTagClick event, we can control that. Here is the peice of the code for the same. Just put this code on the load event.


function onLoadOfCase(executionContext) {
    var formContext = executionContext.getFormContext();
    formContext.getControl('customerid').addOnLookupTagClick(function (e) {
        e.getEventArgs().preventDefault(); // disables the default behaviour of opening the record
        // Get the lookup record
        var lookupRecord = e.getEventArgs().getTagValue();
    });

}

The above code will prevent opening the lookup record when clicked. However if you want to open a record, we can use NavigateTo API and open the lookup record as a popup without disturbing/loosing the current context.

Here is the piece of the code for the same.


function onLoadOfCase(executionContext) {
    var formContext = executionContext.getFormContext();
    formContext.getControl('customerid').addOnLookupTagClick(function (e) {
        e.getEventArgs().preventDefault(); // disables the default behaviour of opening the record
        // Get the lookup record
        var lookupRecord = e.getEventArgs().getTagValue();
        // Open lookup record as a popup.
        Xrm.Navigation.navigateTo({
            pageType: "entityrecord",
            entityName: lookupRecord.entityType,
            formType: 2, // Only Edit Mode is supported now.
            entityId: lookupRecord.id
        }, {
            target: 2,
            position: 1,
            width: 900,
            height: 600
        });
    });
}


Hope this helps.

--
Happy 365'ing
Gopinath

Open Entity Record as a Modal Popup in Dynamics 365 CE Release Wave 1 2020

Hi Everyone,

Today I was testing new features of PowerApps Release Wave 1 2020 in trial instance and found that now we can open Entity record as a popup. 

Here is the piece of code and it is supported only for opening existing records in the system.


Xrm.Navigation.navigateTo({
        pageType: "entityrecord",
        entityName: "contact",
        formType: 2, // Only Edit Mode is supported now.
        entityId: "27f1a9f5-936d-ea11-a811-000d3a3e14c7"
    }, {
        target: 2,
        position: 1,
        width: 900,
        height: 600

    });


We can also open the record in a specific form by just providing the formId. Try below.


Xrm.Navigation.navigateTo({
        pageType: "entityrecord",
        entityName: "contact",
        formType: 2, // Only Edit Mode is supported now.
        formId: "293c878f-f068-40a0-ae48-4297e060871c",
        entityId: "27f1a9f5-936d-ea11-a811-000d3a3e14c7"
    }, {
        target: 2,
        position: 1,
        width: 700,
        height: 600

    });

Hope this helps.

--
Happy 365'ing
Gopinath

Tuesday 24 March 2020

List Records - Increase the count of the records that are retrieved - Power Automate/Microsoft Flow

Hi Everyone,

Today I was working on the some flow and while testing I have used List Records and intentionally I have not used any filter as I would like to understand the performance. While testing I came to know, the List Records step by default retrieves maximum of 512 records only and the Apply to Each step takes only those 512 records for further processing.

In case if you want retrieve more records, you have to change in the Settings as below.

By default, Pagination would be Off. Turn it on and adjust the limit as per your needs. The maximum you can set is 100000.


Hope this helps.

--
Happy 365'ing
Gopinath

How to get the Iteration count in an Apply to Each Function in Power Automate/Microsoft Flow

Hi Everyone,

Here is the way to get the count of Apply to Each function. 

You can initialize a variable outside of the Apply to Each, then use the Increment Variable inside the Apply To Each to increment it through each iteration.
  

Hope this helps.

--
Happy 365'ing
Gopinath

Monday 23 March 2020

How to enable Sales Hub in Dynamics 365 CE Environment

Hi Team,

To test some of the new functionalities, I have created a trail account of Dynamics 365 and while set up I haven't selected Sales option. After setup for my testing I needed Sales Hub and as I have not selected it at the time of Setup I don't have it in my trail account.

Here are the steps to be followed to get Sales Hub.

1) Open Admin Center - https://admin.powerplatform.microsoft.com/environments
2) Go to Admin centers and click on Dynamics 365
3) Click on Edit Solutions Icon
4) Search for Dynamics 365 Sales Application
5) Install It.

It will take few mins to install and status changes from Installation pending, Installing to Installed once the installation is completed.

Hope this helps.

--
Happy 365'ing
Gopinath