Sunday, 6 November 2016

Configure Editable Grid in Dynamics 365

The most awaited feature of Dynamics CRM is Editable Grid. Here are the list of things which are supported via Editable Grid.
  • In-grid editing of records at the entity or sub-grid level
  • Web and mobile clients
  • Navigation using a keyboard or mouse
  • Grouping and Sorting (Able to group by/sort by any column on current view)
  • Filtering
  • Moving and resizing columns
  • Pagination
  • Lookup configuration
  • Calculated fields and Rollup fields
  • Business rules
  • Hierarchical view
  • Enabling or disabling of cells based on security role
  • Editable Grid respect read-only grid metadata and configurations
  • Editable Grid support the below JavaScript events for home grid and sub-grids: Check this Post for more information on the events.
    • OnRecordSelect
    • OnSave
    • OnChange
  • Editable Grid support the below entity level Business Rules:
    • Show error message
    • Set field value
    • Set business required
    • Set default value
    • Lock or unlock field
  • Editable Grid supports most of data types except:
    • State
    • Customer type field
    • Composite field
    • Partylist
    • Lookup entity related fields

Here are the steps to Enable it on Dynamics 365

Navigate to Settings -> Customizations -> Customize the System.

Click on the entity (for example : Account) for which you want to configure the grid. Click on Controls Tab.


click on "Add Control" and select on Editable Grid.
Select Web Option for the Editable Grid Control.


Microsoft Dynamics 365 Read-Only Grid is the initial default for Web, Phone and Tablet.
After adding an Editable Grids control to an entity you will get a Events tab for setting the events to fire in the grid (Check this Post)
Click on Add Lookup link as shown below to select the view.


In the “Configure Property Add Lookup” dialog, in the Available Views drop-down, select which view to add the lookup to (eg My Active Accounts) and the lookup column you want added (eg Primary Contact) in the Available Columns drop-down.

Click on Save and Publish the entity.


Navigate to Accounts -> My Active Accounts View, you will see Editable Grid.
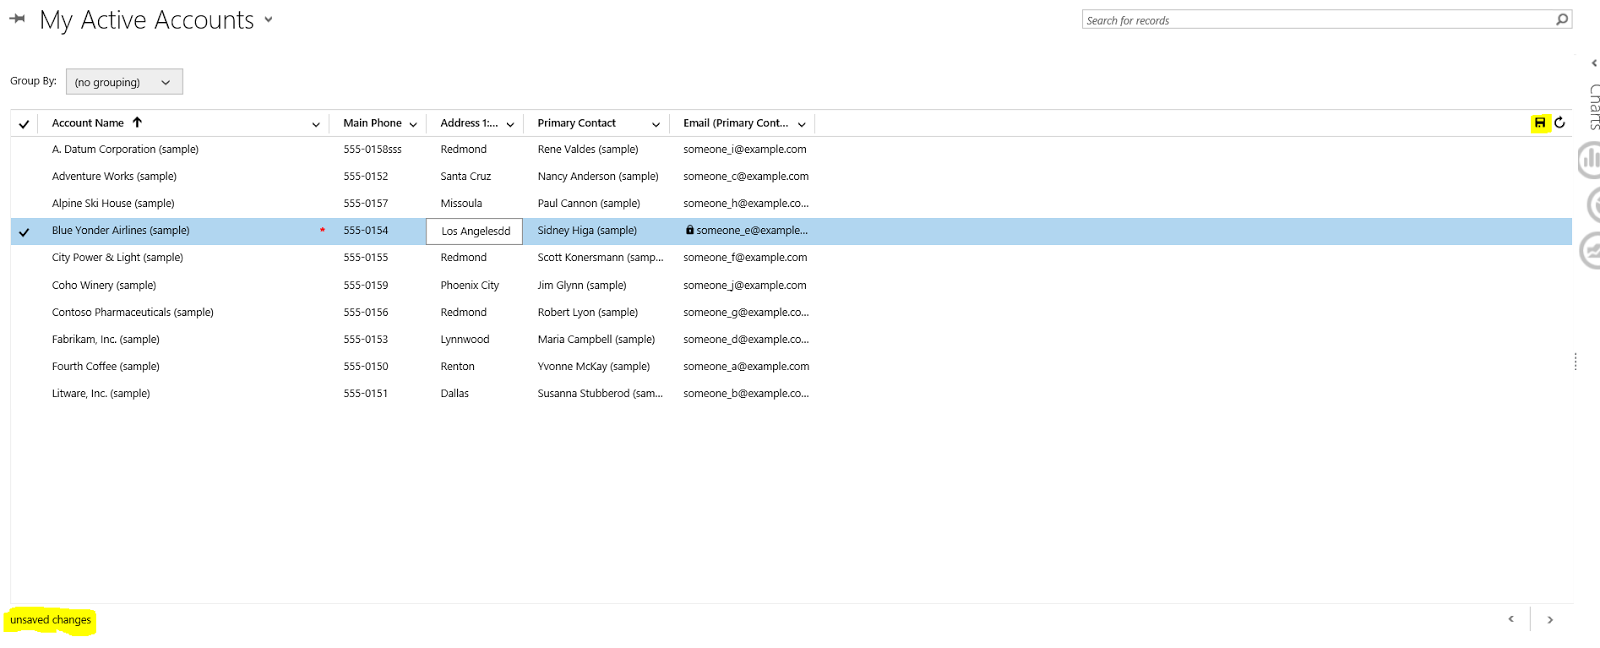
We can edit the data inline and will unsaved changes label at the below.
We can also apply grouping, eg group the grid by the field “Address 1: City”
Check this for Editable Grid Events


Hope this helps.
--
Happy CRM'ing
Gopinath

Monday, 31 October 2016

Alternate Keys in Dynamics CRM

Hi,

One of the challenges we get in integrations when integrating external data with CRM is that in Order to update a record, we must know the GUID of the record.

Now with the introduction of alternate keys in CRM, we can use a unique value in the data set as a key for updating records as part of an integration.

For example, you have an external system that you want to integrate to your Account entity and system uses an email address as its key. You will have to define email address field as a alternate key on the Account entity.

Navigate to Customize the System -> Account Entity-> Keys -> New

select the field you want to use as a key (Emailaddress in this example), click Add. Give it a Display Name. Click Ok.


The system will then create a database index on that field to ensure fast querying and enforce the uniqueness of the values. Depending on how much data you have in your database, this could take a while. While this is processing, the key’s status will be either In Progress.
When the indexing operation is complete, the key’s status will change to Active.
You can use this key for Update and Upsert operations via the SDK. Here is the sample of Upsert Operation.

Entity entAccount = new Entity("account", "emailaddress1", "gopinath@crm.com");
entAccount.Attributes["name"] = "My Account 1234";
UpsertRequest request = new UpsertRequest()
{
      Target = entAccount
};
UpsertResponse response = (UpsertResponse)service.Execute(request);


The alternate key can be used for Entity Reference as well, wherein instead of specifying GUID we can now use alternate key.

Entity entContact = new Entity("contact");
entContact.Attributes["lastname"] = "Alternate Key Contact";
entContact.Attributes["parentcustomerid"] = new EntityReference("account", "emailaddress1", "gopinath@crm.com");
service.Create(entContact);

Points to remember
  • You can define up to five different keys for an entity
  • Currently alternate key can only be defined on field type – string, integer and decimal.
Hope this helps.

--
Happy CRM'ing

Gopinath

Tag Users and Records in Posts in Dynamics CRM

Hi,

Social Pane in CRM is very useful to the end users where they can track of Activities and Notes. Most of the users end up ignoring the Posts features. In this post, I would like to give the information about Posts in CRM.

Posts - Its looks very much like the wall on your Facebook and LinkedIn. Most of the users see automated Posts which are generated in the system when a new record is created, or opportunity is won etc..
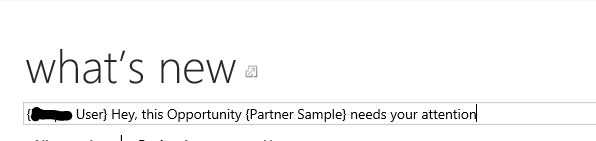
Users can create posts and they can also tag other users or records. When the user make a post on the social pane of the record by tagging the other user that will be visible in the What's new section.
Tagging users or even other records in a post is easy – all you have to do is type the @ symbol.

Users will be presented with a list of possible records based on what they have viewed recently in CRM. User can select one of the records listed or click on Look up more records, which shows the familiar search dialog box.
After finding the user or record you want to tag, you will see the record’s name in the post displayed in brackets. Now you can write the rest of the text and you can even tag another record.

This post is now visible on your page, on your colleague’s page, and on the page for the tagged opportunity


Hope this helps.
--
Happy CRM'ing

Gopinath

Retrieve Statistics of Plugins/Workflow in Sandbox in Dynamics CRM

Hi,

CRM collects information about the plugins and custom workflows activities executing in Sandbox mode in PluginTypeStatistic records approximately every hour. The generated record produces information about the average execution time of each plugin and how many times it failed, killed or successfully executed.

Hope this helps.

--
Happy CRM'ing
Gopinath

Setting Up Automatic Case Creation Rules in Dynamics CRM 2013 SP1/CRM 2015/CRM 2016

Hi,

Whenever we are work with cases in CRM most of the times there is a requirement to automatically create cases based on defined business rules and from multiple channels like email, chat, etc. Many of us have already achieved this in earlier versions of Microsoft Dynamics CRM by creating Custom Workflows.
Now, we can achieve this with in OOB CRM with very less configurations. Here is the way for it.
Navigate to Settings -> Service Management -> Automatic Case Creation Rules

Click on Automatic Creation Rules which will show you the list of existing rules.
To create a new rule click on the + New button on the command bar.
Fill the information
Name – Represents a unique name for the rule.For example - Rule to Create Case from Email
Source Type – Either email or social monitoring which indicates the case to be created automatically from email or social messages. I have selected my source type to email.
Queue – Select a queue which should be used for service management. This queue should have a valid mailbox associated with email approved and enabled.
Specify Conditions for Case Creation – These are pre-defined conditions that are available within Microsoft Dynamics CRM. These conditions change based on selected Source Type in this rule. You can select 0 or more conditions.
For Source Type of email you will see the following conditions:
1) Create cases for email from unknown senders –
Select this option if you want to convert email messages from an unknown senders into cases. If you don’t select this option then cases are created only from senders who have either CRM contact or account record.
2) Create case if a valid entitlement exists for the customer –

Select this option if you want to create cases only if a valid entitlement exists for the customer who is sending the email. This will only work if the contact parent account has a valid entitlement.
3) Create cases for activities associated with a resolved case –

Select this option if you want to create a case if the email is related to a resolved case. If the email is related to an active case a new case won’t be created. If you select this option then you can also select duration. A case will be created only if the case is resolved earlier than the duration specified.

If you have selected Source Type as Social Activity, you will see below two options.
1) Create cases for blocked social profiles – Select this option if you want to create cases from social posts from blocked social profiles.
2) Create cases for private messages only – Select this option if you want to create cases from social posts that are sent as direct or private messages to the queue specified in the case conversion rule. Otherwise, cases will be created for all social posts including public messages (timeline).

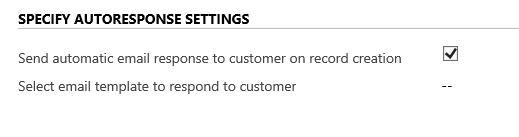
Specify Auto Responses for Case – Select this options if you want to automatically send email responses to the sender of the email after a case for the email has created in CRM. You can also select the email template to use for the email.
Now, you can save the rule by clicking on Save button in the command bar. By default, the title field of the new case is set to the subject of the email and the customer field is set to the sender of the email. If the sender of the email is a contact with a parent account, the customer field is set to the parent account, and the contact field is set to the sender of the email. We can also change these properties by following the below steps.
Specify Case Details
Click on + button in the Specify Case Details section

Here I wanted to create a case every time an email is sent to the specified Queue in the Queue field of the record. We can have many conditions, this is very familiar UI (Workflow UI) to the CRM Consultant
Activate the Rule once you are done with the settings.
Send an email to the configured Queue and navigate to Settings -> System Jobs, you will see a workflow  status as Succeeded and a case will be created in CRM.

Hope this helps.
--
Happy CRM'ing

Gopinath

Sunday, 23 October 2016

Delete Components by Importing Solutions in CRM 2016

Hi,

Many times we have a situation and thought of deleting Components from a Managed Solution using Solution Import.

Here is the example scenario

"I have a field in an entity.  After deploying a managed solution to production, we decided we don’t need that field any longer.  I removed it from my development environment.  When I deploy an updated version of managed solution in production, the old field is still there."

Now it is possible with CRM 2016 by Cloning a Solution and here are the steps for the same.

I have a created a solution with two entities in it. This is my original Solution.


1) DeleteThis
2) MyEntity


Export the solution and import to the Target CRM Instance.

On Source Instance, select the solution and click on Clone Solution. Just before click that, note down the version of the solution.

Once you click on Clone Solution, it gives a popup where Version is auto incremented. Click on Save.
The existing solution will be over-ridden by the cloned solution with change in the version.

Open the cloned solution and delete the entity/components which you want. I have deleted "DeleteThis" entity from the solution.
Export the Managed Solution and import to Target Instance.
While Importing you will get screen as below. Select Stage for upgrade checkbox as we are upgrading the solution.
After import, you see CRM 2016 will create a solution named same as your solution, but with a suffix '_Upgrade'.


Click on Apply Solution Upgrade button. It will take couple of minutes and CRM will automatically manage to delete the component for you, and at successful completion of this step, you will only have one final solution. The entity/component which you have deleted will be no longer be exists on the destination instance.


Hope this helps.
--
Happy CRM'ing

Gopinath

Wednesday, 19 October 2016

Access fields in Header and Footer using JavaScript

Hi,

Most of times we get a requirement to access fields on Header and Footer using JavaScript.
There is a little difference in the schema to access them. That is we just need header/footer as a prefix to the field name. Below are the some of the examples.

Accessing Header Fields
//Set Enabled to True:
Xrm.Page.getControl("header_fieldname").setDisabled(false);
//Set Enabled to False:
Xrm.Page.getControl("header_fieldname").setDisabled(true);
//Set Visibility to False:
Xrm.Page.getControl("header_fieldname").setVisible(false);
//Set Visibility to True:
Xrm.Page.getControl("header_fieldname").setVisible(true);
//Get Attribute Value in Footer:
Xrm.Page.getControl("header_fieldname").getAttribute().getValue();
//Set Attribute Value in Footer:
Xrm.Page.getControl("header_fieldname").getAttribute().setValue("anything");

Accessing Footer Fields
//Set Visibility to False:
Xrm.Page.getControl("footer_fieldname").setVisible(false);
//Set Visibility to True:
Xrm.Page.getControl("footer_fieldname").setVisible(true);
//Get Attribute Value in Footer:
Xrm.Page.getControl("footer_fieldname").getAttribute().getValue();
//Set Attribute Value in Footer:
Xrm.Page.getControl("footer_fieldname").getAttribute().setValue("anything");


Hope this helps.

--
Happy CRM'ing

Gopinath

Friday, 7 October 2016

Prepare Client Customizations

Once you publish customizations, the first user to start one of the CRM mobile apps or the interactive service hub can experience performance issues, because their sign in prompts CRM to prepare the metadata package for download. That means the first user should wait for both the metadata package preparation and the download (subsequent users only should wait for the download).


With Dynamics CRM 2016 Update 0.1 or later, you can improve performance for that first user by clicking the Prepare Client Customizations button after publishing your customizations. This prompts CRM to prepare the metadata package right then instead of waiting for the first user to start a mobile app or the interactive service hub.

Hope this helps.

--
Happy CRM'ing
Gopinath
Thursday, 6 October 2016

Sub Grid client side scripting - CRM 2016

In MS CRM 2016, and Online there are new subgrid related methods added for client side scripting./span>
For subgrid, now we can add event handler for OnLoad. OnLoad event runs every time when subgrid refreshes or when clicking on column heading.
OnLoad Events are addOnLoad and RemoveOnLoad

Xrm.Page.getControl("Opportunities").addOnLoad(OpportunityGridOnloadFunction);
Xrm.Page.getControl("Opportunities").RemoveOnLoad(OpportunityGridOnloadFunction);
To use addOnLoad or RemoveOnLoad you need to get object of grid and then add event handler.
There are some methods to access data from grid.

getRows – gives all rows in the grid
getSelectedRows – gives only selected rows in grid
getTotalRecordCount – gives total number of records in grid.

We can also get Grid Columns, Entityname, Entity Reference, RecordId, Primary Attribute Value
Here is the sample code.

getSubGridRowData = function () {
    //Get Sub Grid object
    var oppSubGrid = Xrm.Page.getControl("Opportunities").getGrid();
    //Get sub grid rows
    var gridRows = oppSubGrid.getRows();
    //  var gridRows = oppSubGrid.getSelectedRows();
    //loop through each row to get values of each column
    gridRows.forEach(function (row, i) {
        var gridColumns = row.getData().getEntity().getAttributes();
        //EntityName
        var entityName = row.getData().getEntity().getEntityName();
        //Entity reference - return type is Lookup object
        var entityReference = row.getData().getEntity().getEntityReference();
        //Record Guid
        var recordId = row.getData().getEntity().getId();
        //Primary Attribute, e.g. for account primary attribute is name, it will return value for name attribute in grid row
        var PrimaryAttributeValue = row.getData().getEntity().getPrimaryAttributeValue();
        //loop through each column in row
        gridColumns.forEach(function (column, j) {
            var atrName = column.getName();
            var atrValue = column.getValue();
        });
    });
}


Hope this helps

--

Happy CRM'ing
Gopinath

Tuesday, 27 September 2016

“The type or namespace name 'Route' could not be found” using attribute routing”

Hi,

I was working on Web Api and I gave all the references and I am getting an error saying

“The type or namespace name 'Route' could not be found” using attribute routing”

I downloaded the solution from TFS and using Nuget, it seems that there is a problem in the referencing of assemblies.

Executed the below command in the Package Console and things started working.

Update-Package Microsoft.AspNet.WebApi.WebHost -reinstall

Hope this helps.
--
Happy Coding
Gopinath

Qualify button is not working on Lead Entity

Hi,

Today we have faced a wierd issue where Qualify button is not working in Online CRM. It was a  vanilla crm with very few form layout changes. When we tried the same things with code, it was working fine.

After some search came to know that apparently the field Company Name is required for this process. Just placed back Company Name field on the form and unchecked Visible by default.


Hope this helps.
--
Happy CRM'ing,
Gopinath

Saturday, 20 August 2016

Autogenerate GUID in SQL Table

Hi,
Today I was working on SQL Table creation and I had a requirement to generate a UniqueIdentifier automatically whenever a record is inserted into the table.

We can achieve this requirement by having Column datatype as 'UniqueIdentifier' and Default Value or Binding of the column property should be set to 'newid()'
Hope this helps.
--
Happy Coding

Gopinath

Thursday, 18 August 2016

Get an item from JSON/Filter JSON

Hi,

Today I was working on JavaScript and I had a requirement to get one item from JSON object.
Here is the sample code for filtering.

var vJsonArr = [];
vJsonArr.push({ name: "k1", value: "abc" });
vJsonArr.push({ name: "k2", value: "def" });
vJsonArr.push({ name: "k3", value: "ghi" });
var vfound = vJsonArr.filter(function (item) { return item.name === 'k1'; });

Hope this helps.
--
Happy Coding

Gopinath

Thursday, 21 July 2016

Check/Get user security role in CRM using C# Code

Hi,

Sometimes, we get the requirement to check the security role of the user in code and doing some business operation.

Here is the C# code for getting security role of the user.

QueryExpression queryExpression = new QueryExpression();
queryExpression.EntityName = "role"; //role entity name
ColumnSet cols = new ColumnSet();
cols.AddColumn("name"); //We only need role name
queryExpression.ColumnSet = cols;
ConditionExpression ce = new ConditionExpression();
ce.AttributeName = "systemuserid";
ce.Operator = ConditionOperator.Equal;
ce.Values.Add(userID);
//system roles
LinkEntity lnkEntityRole = new LinkEntity();
lnkEntityRole.LinkFromAttributeName = "roleid";
lnkEntityRole.LinkFromEntityName = "role"; //FROM
lnkEntityRole.LinkToEntityName = "systemuserroles";
lnkEntityRole.LinkToAttributeName = "roleid";
//system users
LinkEntity lnkEntitySystemusers = new LinkEntity();
lnkEntitySystemusers.LinkFromEntityName = "systemuserroles";
lnkEntitySystemusers.LinkFromAttributeName = "systemuserid";
lnkEntitySystemusers.LinkToEntityName = "systemuser";
lnkEntitySystemusers.LinkToAttributeName = "systemuserid";
lnkEntitySystemusers.LinkCriteria = new FilterExpression();
lnkEntitySystemusers.LinkCriteria.Conditions.Add(ce);
lnkEntityRole.LinkEntities.Add(lnkEntitySystemusers);
queryExpression.LinkEntities.Add(lnkEntityRole);
EntityCollection entColRoles = service.RetrieveMultiple(queryExpression);
if (entColRoles != null && entColRoles.Entities.Count > 0)
{
     foreach (Entity entRole in entColRoles.Entities)
     {
         if (entRole.Attributes["name"].ToString().ToLower() == "<Your rolename>")
         {
 
         }
     }
}

Hope this helps.

--
Happy CRM'ing
Gopinath