Thursday, 21 March 2019

Recent Items on the Lookup - D365 UCI


Hi,

We all know that with UCI we are getting number of good features and one of them in that is showing up the recent items on the lookup. Yes, it is a good feature for sure and sometimes we might have written our own filters and this recent items will not honor those rules.

The simple solution for this is we can disable this from the Lookup Properties.


Hope this helps

--
Happy CRM'ing
Gopinath

Wednesday, 20 March 2019

Refresh IFrame in Dynamics 365 UI or UCI

Hi,

We all very used to write the piece of the code from this link whenever we need to refresh the IFrame in CRM.

Very unfortunately, the same code is not working in Dynamics 365 UI version 9.x on wards. No need to worry on that, we have the work around for the same.

We have to pass the WebResource name if it has the full URL and vice versa. Here is the piece of the code for the same. I know, it is little confusion but we have live with it until the PG Team fixes the issue.


                var src = null;
                var newsrc = null;
                var url = Xrm.Utility.getGlobalContext().getClientUrl() + "/WebResources/";
                var iFrameName = "IFramControlName";
                var IFrameControl = formContext.getControl(iFrameName);
                src = IFrameControl.getSrc();
                IFrameControl.setSrc(null);
                if (src.indexOf(url) != 0) {
                    newsrc = url + src;
                }
                else {
                    newsrc = "abc.html";
                }

                IFrameControl.setSrc(newsrc);

Hope this helps.

--
Happy CRM'ing
Gopinath

Tuesday, 19 March 2019

Hide Timeline on Mobile Client on Dynamics 365

Hi, 

As we all know that Timeline is a new control introduced from Version 9.x of Dynamics 365. It is a section on Web UI but on the Mobile it appears as a Tab.

Sometimes as per Business requirement we might have to show and hide the timeline. On the web, it is easy to do as it is a section and the same appears as a Tab on Mobile client and show/hide code written for the section doesn't work here. Technically, it is a tab on the mobile. Here is the code that works on the Mobile. We just need to get the timeline tab name to do this.

        var tabObj = formContext.ui.tabs.get("TIMELINEWALL_TAB_SYSTEM_GENERATED");
        tabObj.setVisible(false);

So we have to show/hide section for Web UI and tab for mobile client.

Hope this helps.

--
Happy CRM'ing
Gopinath

Sunday, 16 December 2018

Power of Pre-Validation Stage in Dynamics 365

Hi,

Today, I got an interesting requirement on the Account Deletion. we all know that when we delete a account, all the records that are associated with it will delete as it is defined in Relation Behaivour. "Delete - Cascade all" and we cannot even change the configuration. 


After some search we got to know the power of Pre-Validation step. we have written a plugin and registered on the PreValidation step. Written a logic to loop through the contacts that are associated with the deleting account and updated ParentAccount lookup of the contacts with null. 

Hope this helps.

--
Happy CRM'ing
Gopinath

Web resouce dependencies in Dynamics 365

Hi,

We all were doing some tricks to refer two JS files on the Ribbbon like declaring one more action as IsNan etc. And now those days are gone, we can now define the dependencies for JavaScript and HTML Web Resource and that makes sure all the required dependent resources are loaded properly.

You just have open a Web Resource and you will find a new tab as Dependencies on it.

Hope this helps.

--
Happy CRM'ing

Gopinath

Wednesday, 5 September 2018

Dynamics 365 v9: Limitations Of Unified Interface

Hi,

We have started working on the upgrade project from 8.2 to 9.0. As we all know that we have Power Apps in 9.0 and exited about it. We are trying to understand the limitations around that before we start and would like share them here.

  • Advanced Find
  • Bulk edit
  • Merge records
  • Record sharing
  • All options under Set Personal Options (Settings gear)
  • Chart drill down
  • Learning Path
  • Creating personal dashboards and charts
  • Creating personal views
  • Charts as visualization for sub-grids on forms
  • Activities roll-up view
  • Creating email template with slugs
  • Creating duplicate detection jobs
  • Composite address control
  • Run workflow
  • Filtering on read-only grids
  • Run report (SSRS)
  • Letter, Fax, Recurring Appointments
  • Campaign management – campaigns, campaign activities and quick campaign
  • Goal management
  • Marketing list
  • Position entity
  • Global notifications
  • Admin experiences
  • Editable grids on phones
  • Audit Histroy
  • Refresh button on Roll up fields.

I hope these things would be a part of future releases and will share it as and when it gets released.

Hope this helps.

--
Happy CRM'ing
Gopinath

Monday, 3 September 2018

The 'ascending' attribute is not declared - Importing Solution

Hi,

Today I have received the below error while importing the solution in CRM. I was not able to get anything by seeing the error as the information given was not helping to find the exact error and fix it. 


After some search able to find the fix. 

1) Extract the Solution zip file.
2) Open Customizations.xml in a XML Editor (I normally use Visual Studio)
3) Search for "ascending" and remove this text "ascending="true" whereever you find it.
4) Zip the components and import again. You will not get any error this time.

Hope this helps.

--
Happy CRM'ing
Gopinath

Monday, 9 July 2018

Get formContext in Ribbon Command - Dynamics 365 9.0

Hi,

We all know that there are lot of changes to Dynamics 365 JavaScript in accessing form attributes and controls. We should pass executionContext to a function and get the formContext. We can easily the context for onLoad, onChange and onSave events and the problems when we need to get in the functions that are configured to trigger on the Ribbon button click event.

We have a way to solve this issue by passing PrimaryControl as a CrmParameter to the function and in Javascript function pass parameter like below and getFormContext from the parameter what we passed. 


function mySampleFunction(primaryControl) {
            var formContext = primaryControl.getFormContext();
            formContext.ui.controls.get("name").getAttribute().setValue("123")
        }


Hope this helps. 

--
Happy CRM'ing
Gopinath

Tuesday, 27 February 2018

Resolve and Cancel Cases in CRM/Dynamics 365 CE using C#

Hi,

I was working on Service Module and had to develop a tool which can Resolve and Cancel cases.

Here is the C# code for the same.

To Resolve the Cases
        Entity IncidentResolution = new Entity("incidentresolution");
        IncidentResolution.Attributes["subject"] = "Subject Closed";
        IncidentResolution.Attributes["incidentid"] = new EntityReference("incident", guidCase);
        // Create the request to close the incident, and set its resolution to the
        // resolution created above
        CloseIncidentRequest closeRequest = new CloseIncidentRequest();
        closeRequest.IncidentResolution = IncidentResolution;
        // Set the requested new status for the closed Incident
        closeRequest.Status = new OptionSetValue(5);
        // Execute the close request
        CloseIncidentResponse closeResponse = (CloseIncidentResponse)iService.Execute(closeRequest);

To Cancel the Cases
       SetStateRequest request = new SetStateRequest();
       request.EntityMoniker = new EntityReference("incident", new Guid(strGuids[intGuid]));
       request.State = new OptionSetValue(2);
       request.Status = new OptionSetValue(6);
       SetStateResponse objResponse = (SetStateResponse)iService.Execute(request);

Hope this helps.

--
Happy CRM'ing
Gopinath

Friday, 23 February 2018

Create Apps using new App Designer and Site Map Designer in Dynamics 365

Hi,

Apps is one of the super good features that were introduced as part of Dynamics 365. We can create custom apps using App Designer.

Here are the steps to create Custom Apps in Dynamics 365

1) Navigate to Setting --> Application --> My Apps or Settings -->Customizations --> Apps.
2) Create New App by giving the following information

Name: Enter a unique name for the app. 
Unique Name: The unique name is automatically populated based on the app name that you specify. It is prefixed with a publisher prefix. You can change the part of the unique name that's editable. The unique name can only contain English characters and numbers
Description: Type a short description of what the app is or does. 
Icon: By default, the Use Default App thumbnail check box is checked. To select a different web resource as an icon for the app, clear the check box, and then select an icon from the drop-down list. This icon will be displayed on the preview tile of the app. 

select the client type that the app will be used for. 
Web: This is the classic Dynamics 365 web browser client. 
Unified Interface: This is the new Dynamics 365 web browser client that has a similar interface across PC and mobile devices. 

App URL Suffix: The app URL is automatically populated based on the app name that you specify. You'll see a preview of how the complete URL looks. The app URL must be unique. 

For on-premises: http://<server>/<org name>/Apps/<App URL> 
For online organizations: https://<server>. crm#.dynamics.com/Apps/<App URL> 

Use existing solution to create the App: Select this option to create the app from a list of installed solutions or just click on Done to Create the App.

Once the App is created, you can add the required components to it.

Click on the Site Map and it will open the Site Map Designer for this App. We can have separate
Site Map for this app.

You can design the Site Map by adding the required components to it.

In the same way, we can add Dashoboards, Entity Forms, views and Charts has to be added to the App.

After you are done with your changes, Publish the App by clicking on the Publish button.

Once you publish the app, you can go to My Apps --> Open the App which you want or you can also frame URL like below.

For on-premises: http://<server>/<org name>/Apps/<App URL> 
For online organizations: https://<server>. crm#.dynamics.com/Apps/<App URL>

Or else user can have access the apps by clicking on Down Arrow just beside Dynamics 365 as shown below.
We can also Assign Security Roles for which we have to give the access.

Hope this helps.

--
Happy CRM'ing
Gopinath

Friday, 16 February 2018

Dynamics 365 – Plug-in registration tool – Unable to connect to organization

Hi,

Recently, I was trying to connect to the trail version (9.0) using Plugin Registration Tool which was working some days back. 

The reason for it was with Version 9.0, we have download  all Tools, Dlls fron Nuget.

Here is the way to download the Plugin Registration Tool from nuget

1) Open Visual Studio
2) Create a new Project (Console Application)
2) Go to Tools -> NuGet Package Manager -> Manage NuGet packages for Solution.

3) Browse and install “Microsoft.CrmSdk.XrmTooling.PluginRegistrationTool” 9.0.0.7 version.
4) After installation, go to the project physical folder and open Packages folder.
5) You will see Plugin Registration Tool there and use that connect to CRM for registering plugins.

--
Happy CRM'ing
Gopinath

Tuesday, 17 October 2017

Execute a Scriplet on a Action Call

Hi,

Now a days, I have started exploring USD and learning small things here and there. 

I got a requirement to Open a Web Page by considering some parameters from Account record in USD. To achieve this thing, we can directly pass parameters in the Data field of the Action Call but if there any conditions to check and frame the URL, we have to use Scriplet.

To create a scriplet, Navigate to CRM -> Settings -> Unified Service Desk -> Scriplets -> New

Give the name as per you wish

Write a code in the Script Text field. And don't forget to call the same method again as show in below.

function openGooglePage() {
    var vName = "[[account.name]]";
    var url = "http://www.google.com/search?q=" + vName;
    return url;
}


openGooglePage();

Now create an action call and give url=[[$scriptlet.OpenGooglePage]] in the Data column.


Hope this helps.

--
Happy CRM'ing
Gopinath

Monday, 25 September 2017

Value Cannot be null - CRM Developer Tool Kit

Hi,

We are setting up a new project in Visual Studio for one of the implementation and installed latest Develper Tool Kit. 

While deploying the Visual Studio was throwing an exception saying Value Cannot be null and when we checked, the error is because of we didn't set up the Path under Tools -> Dynamics 365 Developer Toolkit -> Tools Paths.


Surprisingly, even after setting path we are getting the same error. After spending lot of time found the resolution for it.

Build Action for RegisterFile.crmregister was set to Content. Changing it to RegisterPlugin solved the issue.


Hope this helps.

--
Happy CRM'ing
Gopinath

Tuesday, 12 September 2017

Track Contacts in Dynamics 365 via Outlook App

Hi,

Today our customer said that Tracking of a contact via Outlook App is no more working. When I have tested, it is working. 

Had a screen sharing session with the customer and downloaded Fiddler on his machine and checked the calls. And found a call failed with 500 error code and here is the error message.

message=A validation error occurred.  The length of the 'emailaddress1' attribute of the 'contact' entity exceeded the maximum allowed length of '100'.

I checked the Contact in Outlook and Email Address field was crossing the limit and our customer gave some data just to check the tracking.

Unfortunately, the App won't the message to the user. It's not only Email Address field but any field that is crossing the limit will create the same.

Hope this helps.

--
Happy CRM'ing
Gopinath

Saturday, 9 September 2017

Connect to Dynamics CRM WebApi from Console Application

Hi,

I was hearing some requirement to connect to CRM Webapi from a console application. but never got a chance to really check. However, here are the steps that has to be foollwed and the code.

To connect CRM Web Api there are two steps.

1) Register the Application with the Azure Subscription
2) Build the Console Application to connect to CRM Web Api by using Client ID and Authority URL.

Just one thing to remember is the below process works if both CRM and Azure are under same tenant. If they are different tenant, we have to follow different process. Will try to write it next time.

Register the Application

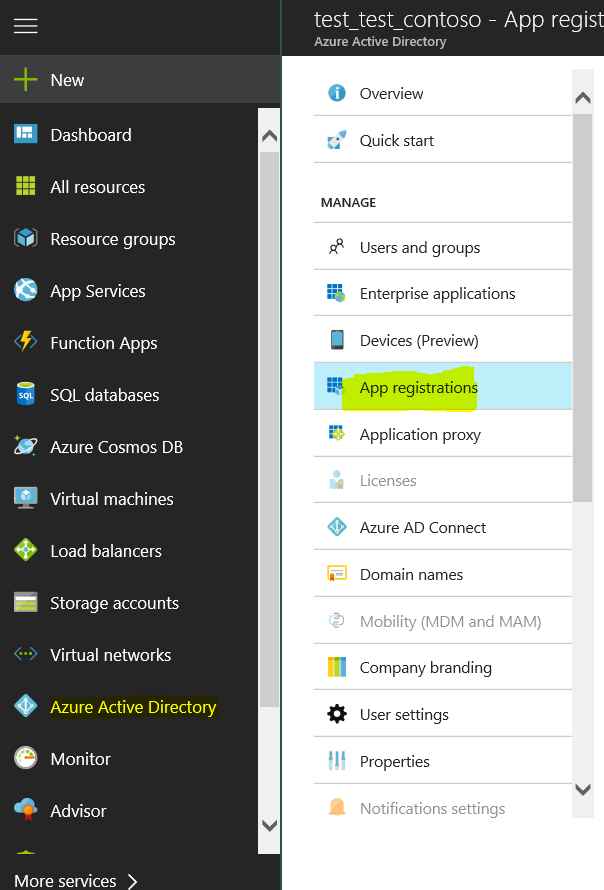
1) Login to https://portal.azure.com and navigate to Azure Active Directory and click on New Application Registration button. 


2) Enter the Name (whatever you wish). You can use any name which should be unique in the App Registrations.
3) Selecte Application Type as Native as we are not building any WebApplicaton/Web Api.
4) Next is Redirect URL. This is something, AD will redirect once the Authentication is done. You can put anything in the following format as we are calling this from Console Application.

XXXXXXX://XXXXXX

Note this URL as we need this in the Console Application

5) Click on the Create button to Register the App. Once the App is registred, you will get the Application ID.

6) Go to the settings of the app -> Required Permissions -> Add -> Select an API -> Dynamics CRM Online -> Select

7) And in the same place, click on Select Permissions and select "Access CRM Online as organization users" and click on Select.


Please note down the following to use in the Console Application

1) Client ID - Which is an Application ID of the App
2) Redirect URL - The one which we gave in Step 4 from above

Console Application

1) Create a Console Application.
2) Add Microsoft.IdentityModel.Clients.ActiveDirectory dll reference. If you don't have that, get it from Nuget Package.

Here the complete code which you can copy and paste and make sure you change the Global Variables accordingly.

using Microsoft.IdentityModel.Clients.ActiveDirectory;
using System;
using System.Collections.Generic;
using System.Linq;
using System.Net;
using System.Net.Http;
using System.Net.Http.Headers;
using System.ServiceModel.Description;
using System.Text;
using System.Threading.Tasks;


namespace CRMWebApiConnection
{
    class Program
    {
        /// <summary>
        /// Holds the Authentication context based on the Authentication URL
        /// </summary>
        static AuthenticationContext authContext;

        /// <summary>
        /// Holds the actual authentication token once after successful authentication
        /// </summary>
        static AuthenticationResult authToken;

        /// <summary>
        /// This is the API data url which we will be using to automatically get the
        ///  a) Resource URL - nothing but the CRM url
        ///  b) Authority URL - the Microsoft Azure URL related to our organization on to which we actually authenticate against
        /// </summary>
        static string apiUrl = "https://abc.crm5.dynamics.com/api/data";

        /// <summary>
        /// Client ID or Application ID of the App registration in Azure
        /// </summary>
        static string clientId = "ec014b98-af68-48fc-9147-7928420c08d7";


        /// <summary>
        /// The Redirect URL which we defined during the App Registration
        /// </summary>
        static string redirectUrl = "my-Console://CRMConsole";

        static void Main(string[] args)
        {
            GetToken();

            Console.ReadLine();

        }

        internal static async void GetToken()
        {
            try
            {
                // Get the Resource Url & Authority Url using the Api method. This is the best way to get authority URL
                // for any Azure service api.
                AuthenticationParameters ap = AuthenticationParameters.CreateFromResourceUrlAsync(new Uri(apiUrl)).Result;

                string resourceUrl = ap.Resource;
                string authorityUrl = ap.Authority;

                //Generate the Authority context .. For the sake of simplicity for the post, I haven't splitted these
                // in to multiple methods. Ideally, you would want to use some sort of design pattern to generate the context and store
                // till the end of the program.
                authContext = new AuthenticationContext(authorityUrl, false);

                try
                {
                    //Check if we can get the authentication token w/o prompting for credentials.
                    //With this system will try to get the token from the cache if there is any, if it is not there then will throw error
                   // authToken = await authContext.AcquireTokenAsync(resourceUrl, clientId, new Uri(redirectUrl), new PlatformParameters(PromptBehavior.Never));
                    var userName = "XXXX@XXXX.onmicrosoft.com";
                    var password = "XXXXXXX";
                    UserCredential credentials = new UserPasswordCredential(userName, password);
                    authToken = await authContext.AcquireTokenAsync(resourceUrl, clientId, credentials);

                }
                catch (AdalException e)
                {
                    if (e.ErrorCode == "user_interaction_required")
                    {
                        // We are here means, there is no cached token, So get it from the service.
                        // You should see a prompt for User Id & Password at this place.
                        authToken = await authContext.AcquireTokenAsync(resourceUrl, clientId, new Uri(redirectUrl), new PlatformParameters(PromptBehavior.Auto));
                    }
                    else
                    {
                        throw;
                    }
                }

                Console.WriteLine("Got the authentication token, Retrieving data from Webapi");

                GetData(authToken.AccessToken);

            }
            catch (Exception ex)
            {
                Console.WriteLine($"Please see the exception details : {ex.ToString()}");
            }
        }

        internal static async void GetData(string token)
        {
            using (HttpClient httpClient = new HttpClient())
            {
                httpClient.Timeout = new TimeSpan(0, 2, 0);  // 2 minutes time out period.

                // Pass the Bearer token as part of request headers.
                httpClient.DefaultRequestHeaders.Authorization =
                new AuthenticationHeaderValue("Bearer", token);


                var data = await httpClient.GetAsync("https://abc.crm5.dynamics.com/api/data/v8.2/accounts?$select=name");


                if (data.StatusCode == System.Net.HttpStatusCode.OK)
                {
                    // If the status code is success... then print the api output.
                    Console.WriteLine(await data.Content.ReadAsStringAsync());
                }
                else
                {
                    // Failed .. ???
                    Console.WriteLine($"Some thing went wrong with the data retrieval. Error code : {data.StatusCode} ");
                }
                Console.ReadLine();

            }
        }
    }
}


Hope this helps.

--
Happy CRM'ing
Gopinath